Build Introduction
Rogue leveling is a breeze as you fly through Sanctuary with the  Rapid Fire and
  Flurry leveling build. This is your leveling guide for Diablo 4, with the maximum Skill Point allocation at Level 60. Let us go over the build mechanics, character progression, and playstyle!
This Dual Core Skill build is perfect for players who want the best of both single-target damage and Area of Effect (AoE) clearing.  Rapid Fire deals high single-target damage to snipe elite and bosses, while
  Flurry hits every enemy around the Rogue with AoE damage.
Unlike builds using  Shadow Imbuement or other cooldowns to clear packs of enemies, this hybrid build has unlimited AoE available for every engagement. Another key advantage is having both Cutthroat and Marksman Skills to activate
  Close Quarters Combat for more Attack Speed and Damage.
Check the Rogue Leveling Guide Overview for a comparison of all the starter builds on Icy Veins.
Quick Navigation
Want to skip ahead? Use the table below to jump to sections.
Allocation of Skill Points
The following table shows the order in which to allocate your Skill Points while leveling with the Dual Core Rapid Fire Flurry Rogue build. You gain 59 points at Level 60 and 12 points from Renown, for a total of 71.
Skill Bar and Skill Tree Points
If you are unsure on how to use these Skills, read the Build Mechanics section after setting up your Skill Bar.
Wondering what comes after Level 60 or which Paragon boards to pick? Head to the Rogue Builds page and choose an endgame build to continue your character progression.
Rogue Class Mechanic – Specialization
Once you reach Level 15, immediately complete the True Potential class questline to unlock the Rogue Specialization. Combo Points is the preferred Specialization for leveling a Rogue.
Build Combo Points with  Puncture to unleash additional damage and arrows for
  Rapid Fire. Combo Points can also be used to gain additional damage and an Attack Speed buff with
  Flurry.

Gear, Stats, Gems, and Runes
The following sections cover the important systems that are essential to improving the power of your character during the leveling process. Higher Item Power generally indicates stronger gear, but you should also consider the affixes and effects that are relevant to your class and build.
Legendary Aspects
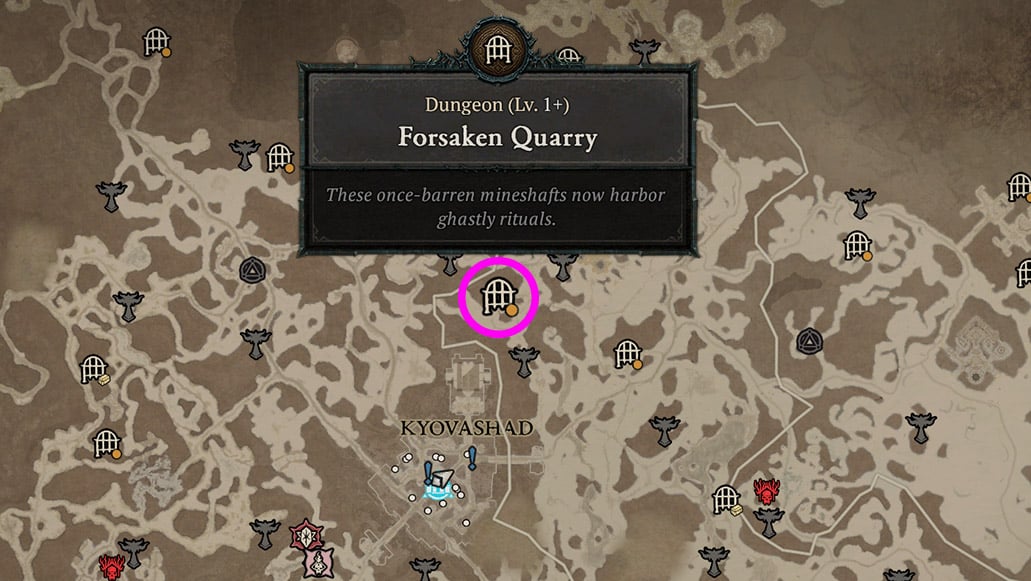
 Aspect of Encircling Blades can be unlocked in the Codex of Power by completing the Forsaken Quarry in Fractured Peaks. It is located right above the first major town of Kyovashad. The dungeon is part of the Rogue Specialization Quest, so follow it after it unlocks at Level 15. Immediately visit the Occultist to imprint this Aspect onto an item to increase the AoE range of
  Flurry.
Higher Tier Aspects with stronger effects can be found on dropped Legendary Items. Salvage unwanted Legendary Items at the Blacksmith to unlock these Aspects in the Codex of Power, and then imprint them onto well-rolled Rare Items. Check the in-depth Aspect and Codex of Power guide for more information.
Listed below are all the Aspects found on Legendary Items that are important for the Rapid Fire and Flurry Rogue leveling build. They are listed in order of priority. For the best results, combine these Aspects with the ideal Stat Priorities. The best-in-slot Aspects List is in the Endgame Guide for Dual Core Rogue.
| Aspect Name | Legendary Aspect Power | Source |
|---|---|---|
 Aspect of Encircling Blades Aspect of Encircling Blades | Flurry damages enemies in a circle around you and deals [35 – 55%] increased damage. | Forsaken Quarry, Fractured Peaks |
 Breakneck Bandit’s Aspect Breakneck Bandit’s Aspect | Flurry deals [25 – 40%] increased damage and has a 20% chance to Stun enemies for 3 seconds with each hit. | Random Drop Only |
 Aspect of the Expectant Aspect of the Expectant | Attacking enemies with a Basic Skill increases the damage of your next Core Skill cast by [5 – 10%], up to 30%. | Underroot, Scosglen |
 Edgemaster’s Aspect Edgemaster’s Aspect | Skills deal up to [10 – 20%] increased damage based on your available Primary Resource when cast, receiving the maximum benefit while you have full Primary Resource. | Oldstones, Scosglen |
 Aspect of Retribution Aspect of Retribution | Distant enemies have a 8% chance to be Stunned for 2 seconds when they hit you. You deal [10 – 20%] increased damage to Stunned enemies. | Abandoned Mineworks, Kehjistan |
 Aspect of Might Aspect of Might | Basic Skills grant 20% Damage Reduction for [2 – 6] seconds | Dark Ravine, Dry Steppes |
 Rapid Aspect Rapid Aspect | Basic Skills gain [15 – 30%] Attack Speed. | Buried Halls, Dry Steppes |
 Accelerating Aspect Accelerating Aspect | Critical Strikes with Core Skills increase your Attack Speed by [15 – 25%] for 3 seconds. | Random Drop Only |
Stat Priority and Tempering Affixes
Listed below are the affixes to prioritize on gear during the early leveling of a Dual Core Rapid Fire Flurry Rogue, ranked by importance. Affixes on the same line have equal value, so attempt to obtain all affixes in each line before moving on to the next.
The Item Power of Weapons determines its DPS and is the most important factor when searching for upgrades. When comparing weapons with similar Item Power, Crossbows are preferred over Bows for a higher Damage per Hit for ![]() Rapid Fire. Daggers are selected for the fastest weapon speed to generate Combo Points.
Rapid Fire. Daggers are selected for the fastest weapon speed to generate Combo Points.
Prioritize Boots with the implicit effect, attacks reduce Evade’s cooldown, for constant Evades to activate  Advanced Rapid Fire and
 ![]() Advanced Flurry.
Advanced Flurry.
The most beneficial tempering affixes while leveling are included below. Check the Tempering Guide for more information on this system.
| Slot | Gear Affixes | Tempering Affixes |
|---|---|---|
| Weapons | 1. Vulnerable Damage 2. Maximum Life, Dexterity | |
| Helm | 1. Cooldown Reduction, Energy per Second 2. Resistances, Armor 3. Maximum Life, Dexterity, Lucky Hit Chance | |
| Chest | 1. Energy per Second 2. Resistances, Armor 3. Maximum Life, Dexterity | |
| Gloves | 1. Ranks to Core Skills, Critical Strike Chance, Attack Speed 2. Resistances, Armor 3. Resource Cost Reduction, Maximum Life, Lucky Hit Chance | |
| Pants | 1. Resistances, Armor 2. Maximum Life, Dexterity | |
| Boots | Implicit Stat: Attacks Reduce Evade’s Cooldown 1. Movement Speed, Energy per Second 2. Resistances, Armor 3. Ranks to Dash, Maximum Life, Dexterity | |
| Amulet | 1. Ranks to Unstable Elixirs, Exploit, Malice, or Weapon Mastery 2. Cooldown Reduction, Attack Speed | |
| Rings | 1. Critical Strike Chance, Attack Speed 2. Resource Cost Reduction, Critical Strike Damage, Vulnerable Damage, Resistances, Maximum Life 3. Dexterity, Lucky Hit Chance |
↑ Back to Legendary Gear Table
Gems and Runewords
Listed below are the best Gems and Runes to socket into gear for each item type.
Gems
| Weapon Gems | Armor Gems | Jewelry Gems |
|---|---|---|
| Any Resistance Gems needed or |
Runewords
Runes drop after unlocking them during the Vessel of Hatred campaign. A Rune of Offering and a Rune of Invocation can be combined by inserting them into equipment with 2 available sockets, creating a Runeword. A limit of 2 Runewords can be equipped.
Listed below are the best Runewords utilizing Magic and Rare Runes that are beneficial for this build.
| Runewords | Effects |
|---|---|
| Gain: 200 Offering — Drink a Healing Potion. Requires: 100 Offering, Cooldown: 1 Second — Evoke the Rogue’s Stun Grenades, Stunning and dealing damage to enemies. | |
| Gain: 1000 Offering — Become Injured or Crowd Controlled (Cooldown: 10 seconds). Requires: 400 Offering, Cooldown: 1 Second — Evoke the Barbarian’s Challenging Shout, reducing your damage taken for 3 seconds. |
Horadric Spells and Jewels (Season 9)
Season 9: Sins of the Horadrim offers seasonal powers that can be utilized to enhance this build. Access Horadic Spells from the Powers tab in the character sheet, and place Horadic Jewels into Jewelry slots.
Unlocking specific powers for a build is challenging due to their random appearance, so utilize any that provide the most damage.
Mercenaries
Once the Den is unlocked during the main questline in the Vessel of Hatred expansion for Diablo 4, complete the Mercenary key quests to acquire them. Hire a Mercenary and enlist a Reinforcement in the following setup.
- Hired Mercenary: Varyana
- Skills:
 Cleave,
  Hysteria,
  Bloodthirst,
  Bloodlust
- Skills:
- Reinforcement: Raheir
- Skill:
 Bastion
 - Opportunity: Cast when the player becomes Injured
- Skill:
Build Mechanics
![]() Flurry provides Area of Effect damage to clear groups of enemies.
Flurry provides Area of Effect damage to clear groups of enemies. ![]() Improved Flurry dashes to enemies to quickly traverse between enemy packs.
Improved Flurry dashes to enemies to quickly traverse between enemy packs.  Rapid Fire is eventually supplemented to deal higher single-target damage to tougher Elites and Bosses.
This hybrid build has an arsenal of both Cutthroat Skills ( Flurry and
  Dash) and Marksman Skills (
 Rapid Fire and
  Puncture) to activate damage increases from
  Close Quarters Combat and eventually Tricks of the Trade in Paragon.
![]() Cold Imbuement freezes enemies to activate damage bonuses from
Cold Imbuement freezes enemies to activate damage bonuses from ![]() Mixed Cold Imbuement and
Mixed Cold Imbuement and ![]() Frigid Finesse.
Frigid Finesse.
Animation Cancel Technique
Evade immediately after using  Rapid Fire or
  Flurry to cancel their casting animations. This technique is important to quickly dodge incoming attacks while activating
  Advanced Rapid Fire. Boots with the implicit effect, attacks reduce Evade’s cooldown by 1.5 seconds, allow for an animation cancel after using 3 Basic Attacks and a Core Skill. Practice hitting Evade after every Core Skill to build muscle memory.

Rotation and Playstyle
AoE Damage Rotation
Explode groups of mobs with the following rotation.
- (Optional)
 Dash to enemies to activate
  Enhanced Dash.
 - Use a Potion to activate the damage buff from
 Unstable Elixirs.
 - Build 3 Combo Points with
 Puncture.
 - Activate
 Cold Imbuement.
 - Cast
 Flurry to deal AoE damage.
 - Immediately animation cancel
 Flurry with an Evade
 - Restart the rotation.
Single Target Damage Rotation
Use the following rotation against Elites and Bosses for high single-target damage.
- Evade to activate
 Advanced Rapid Fire.
 - Use a Potion to activate the damage buff from
 Unstable Elixirs.
 - Build 3 Combo Points with
 Puncture. Make sure you are close enough for
  Fundamental Puncture to apply Vulnerable.
 - Activate
 Cold Imbuement.
 - Cast
 Rapid Fire at the target.
 - Immediately animation cancel
 Rapid Fire with an Evade to restart the rotation.
Elixirs
Visit the Alchemist in any main town to craft helpful Elixirs that increase stats and experience gain for 30 minutes. Make sure to forage plants for ![]() Bundled Herbs during your adventures; they randomly spawn around the world. Elixirs can also drop randomly from enemies and chests during many activities in Diablo 4.
Bundled Herbs during your adventures; they randomly spawn around the world. Elixirs can also drop randomly from enemies and chests during many activities in Diablo 4.
Listed below are the best Elixirs to consume while leveling the Dual Core Rapid Fire Flurry Rogue, ranked by importance.
 Elixir of Resource greatly helps with Energy issues, if you do not already have the appropriate Energy gear. This elixir is highly recommended for starting characters to maintain casts of Core Skills.
 Elixir of Precision provides the highest damage output increase, if not already capped at 100% Critical Strike Chance.
 Elixir of Advantage increases damage output, if not already capped at 100% Attack Speed bonus from gear and Paragon.
 Elixir of Fortitude is the best general-purpose option for survivability.
Return to the Alchemist every 10 Levels to upgrade your potion. The extra healing is essential to survival.
Season 9 Updates
A brief summary of the seasonal changes is provided below. For a complete overview of Season 9, take a look at the comprehensive season guide.
 Concealment
 - Previously: The Skill that breaks Concealment will always be a guaranteed Critical Strike and makes enemies Vulnerable for 6 seconds.
- Now: Breaking Concealment causes all Skills for 4 seconds to be guaranteed Critical Strikes and make enemies Vulnerable for 3 seconds.
 Close Quarters Combat
 - % of Damage to Close reduced from 25% to 10%.
- Damage bonus is capped at 90%.
 Cheat’s Aspect
 - Previously: You take 10-30% less damage from Crowd Controlled enemies. Whenever a Crowd Controlled enemy deals direct damage to you, gain 15% Movement Speed for 2 seconds.
- Now: You have 5-15% increased Damage Reduction and 10% increased Movement Speed, doubled while below 50% Maximum Life.
 Tricks of the Trade
 - Previously: Your Marksman Skills grant your Cutthroat Skills 25%[x] increased damage for 8 seconds. Your Cutthroat Skills grant your Marksman Skills 25%[x] increased damage for 8 seconds.
- Now: Enemies damaged by your Marksman Skills take 30% increased damage from your Cutthroat Skills, and vice versa.
 Eldritch Bounty
 - Previously: When you attack with an Imbued Skill you gain 3% Maximum Resistance and 30% increased damage for that Imbuement’s Element for 9 seconds.
- Now: Each equipped Imbuement Skill grants 3% Maximum Resistance and 30% increased damage for that Imbuement’s Element.
Difficulty and Endgame
Once you hit Level 60 with this build, tackle harder difficulties and more challenging endgame content. Make sure to pick one of our recommended endgame builds for Rogue to continue your journey! The endgame builds also cover the Paragon setup unlocked at Level 60.
Changelog
- June 27, 2025: Guide updated for Season 9 (Patch 2.3.0)
- April 26, 2025: Guide updated for Season 8 (Patch 2.2.0).
- January 21, 2025: Guide updated for Season 7 (Patch 2.1.0).
- October 4, 2024: Guide updated for Season 6 (Patch 2.0.2).
- August 6, 2024: Guide updated for Season 5 (Patch 1.5.0).
- May 14, 2024: Guide updated for Season 4 (Patch 1.4.0).
- January 22, 2024: Guide updated for Season 3 (Patch 1.3.0).
- October 17, 2023: Guide updated for Season 2 (Patch 1.2.0).
