This is a legacy build that is not competitive for the current version of Diablo 4 and which we do not recommend using. It only exists for documentation purposes and will not receive any further updates.
Build Introduction
This is your comprehensive guide for building a toxic werewolf, whose bite is filled with rabies and claws are laced in poison! Welcome to the Poison Shredder build. This  Shred focused build leaps from target to target, unleashing a devastating flurry of critical strikes as it flickers between enemies, ending each one with ease.
Our guide will cover all basic mechanics and deep dive into the optimal setup for skills, Paragon points, and gear for the build. Further down below, you will find a supporting YouTube video as well to showcase the build in action.
Strengths and Weaknesses
- Very strong movement with Shred dash
- Can handle tier 80+ Nightmare Dungeons
- Avoids most Crowd Control lockdowns
- Cooldown management
- Managing Poison DoTs
To see how this build compares to the other builds on our site, you can check out our build tier lists.
Build Requirements
 Aspect of the Blurred Beast
 Aspect of the Stampede
Season of the Construct
Season 3 Patch Updates
The following list details all changes of Season 3 that may pertain to Druids.
Skills
 Wolves
 - Passive damage increased by 30%.
- Active damage increased by 45%.
 Poison Creeper
 - Passive damage increased by 30%.
- Active damage increased by 40%.
 Ravens
 - Passive damage increased by 30%.
- Active damage increased by 20%.
Aspects
 Aspect of the Blurred Beast
 - Previous: While dashing, Shred seeks out Nearby Poisoned enemies instantly dealing 70–100% of the Poisoning damage to them.
- New: While dashing, Shred seeks out Nearby Poisoned enemies and deals 20–40%[x] increased damage to them.
Passives
 Quickshift
 - Damage bonus increased from 5/10/15% to 7/14/21%.
 Ursine Strength
 - Damage and Overpower damage bonuses increased from 25% to 30%.
Seneschal Construct Companion Powers
The Season 3 theme introduces a Seneschal Construct Companion that can deal damage or provide support to complement your character. Equip the Seneschal with two Governing Stones to activate their abilities, and then link them to three Tuning Stones each to augment the abilities. There are 12 different Governing Stones and 27 different Tuning Stones that can be found in Vaults scattered across Sanctuary. Fuse together duplicate stones to level them up, increasing the potency of Governing Stones or adding augments to Tuning Stones.
Listed below are the general recommended Governing Stones and their linked Tuning Stones for Druids, ranked by importance.
- Lightning Bolt: Launch a bolt of Lightning at the target dealing damage. Arcs to other targets dealing a portion of the original damage.
- Evernight: The supported Skill grants you +4 to all Skills when used for 2.0 seconds.
- Resource Support: Player gains an amount of Primary Resource when the supporting Skill first deals damage.
- Efficiency Support: When the supporting skill deals damage, you gain Critical Strike Chance to the same targets hit.
- Arcing Support: The supported Skill can hit additional enemies.
- Flash of Adrenaline: Administers a quick flash of adrenaline into the player, granting bonus damage for a duration.
- Genesis: Increase the effectiveness of the supported Skill by 150%.
- Safeguard Support: When used, the supported Skill grants Damage Reduction to you.
- Tactical Support: Decrease the cooldown of the supported Skill.
- Duration Support: Supported Skills have their durations increased.
Video Guide
Please note that since this written build guide is ever-evolving and videos cannot easily be updated, the below video should serve as more of a guideline, whereas the written guide will always have the most accurate information.
Skill Tree Points and Skill Bar
Follow the points allocated in the image above for the complete 58 point build. The additional skill points past Level 50 are acquired using the Renown system.
| Priority Skills | Cluster |
|---|---|
 Claw, Claw,  Enhanced Claw Enhanced Claw |  Basic Skill Basic Skill |
 Shred Level 5, Shred Level 5,  Enhanced Shred, Enhanced Shred,  Primal Shred, Primal Shred,  Predatory Instinct Level 3, Predatory Instinct Level 3,  Heart of the Wild Level 1, Heart of the Wild Level 1,  Wild Impulses Level 3 Wild Impulses Level 3 |  Core Skill Core Skill |
 Debilitating Roar Level 1, Debilitating Roar Level 1,  Enhanced Debilitating Roar, Enhanced Debilitating Roar,  Ancestral Fortitude Level 3, Ancestral Fortitude Level 3,  Vigilance Level 3 Vigilance Level 3 |  Defensive Skill Defensive Skill |
 Poison Creeper Level 5, Poison Creeper Level 5,  Enhanced Poison Creeper, Enhanced Poison Creeper,  Ferocious Poison Creeper, Ferocious Poison Creeper, |  Companion Skill Companion Skill |
 Neurotoxin Level 1, Neurotoxin Level 1,  Envenom Level 3, Envenom Level 3,  Toxic Claws Level 3 Toxic Claws Level 3 |  Wrath Skill Wrath Skill |
 Ultimate Skill Ultimate Skill | |
 Ursine Strength Ursine Strength | Key Passives |
Spirit Boons – The Druid Specialization
Boons are additional buffs provided to the Druid class as part of their specialization. To unlock your Boons, you will need to complete a simple quest on the west side of the map in the stronghold of “Tur Dulra”. This becomes available at Level 15 and should be completed as soon as possible. The Boon mechanic allows you to pick a single buff from each of the corresponding master animals, and the addition of a second Boon buff from a chosen master animal you select.
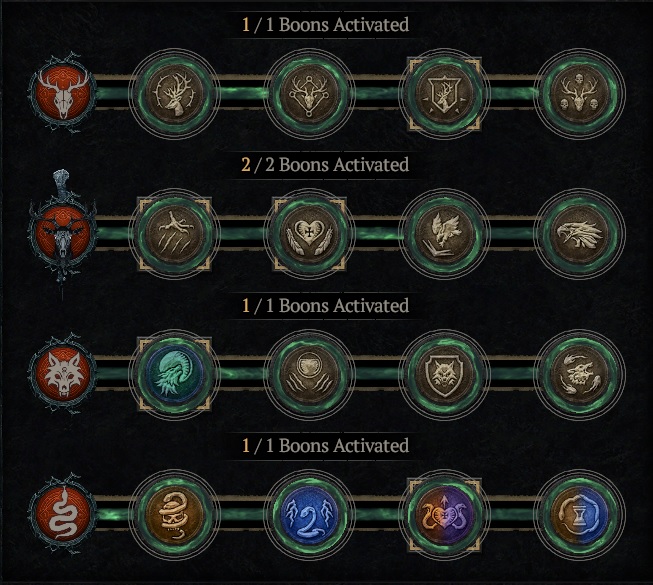
Once you are in the endgame and have completed the skill tree from the previous section, utilize the following set of Boons for the best results.
| Boon Name | Master Animal | Effect |
|---|---|---|
| Wariness | Deer | Take 10% reduced damage from Elites |
| Scythe Talons | Eagle | Gain 5% increased Critical Strike chance |
| Iron Feather | Eagle | Gain 14% Maximum Life |
| Packleader | Wolf | Lucky Hit: Critical Strike have up to a 20% chance to reset the Cooldowns of your Companion Skills |
| Masochisitc | Snake | Lucky Hit: Critical Strikes with Shapeshifting skills have a 75% chance to heal you for 3% maximum life. |
Paragon
We recommend using these Legendary nodes and Rare Glyphs to truly take this build into the endgame. Note that each Rare Glyph’s information listed below is for the Level 21 version.
| Rare Node | Effect |
|---|---|
 Territorial Territorial | – For every 5 Dexterity purchased within range, you deal +[9.6]% increased damage to Close targets. – Additional Bonus unlocked after 25 Dexterity points are purchased in the glyph’s range: You gain 10% Damage Reduction against Close enemies. |
 Undaunted Undaunted | – For every 5 Intelligence purchased within range, you deal +[9.6]% increased damage while Fortified. – Additional Bonus unlocked after 25 Intelligence points are purchased in the glyph’s range: You gain up to 10% Damage Reduction the more Fortify you have. |
 Fang and Claw Fang and Claw | – Grants +[144]% bonus to all Magic Nodes within range. – Additional Bonus unlocked after 40 Willpower points are purchased in the glyph’s range: While in Werewolf or Werebear form, Close enemies take 12%[x] increased damage from you. |
 Spirit Spirit | – For every 5 Dexterity purchased within range, you deal +[10.4]% increased Critical Strike Damage. – Additional Bonus unlocked after 25 Dexterity points are purchased in the glyph’s range: Critical Strikes increase the damage an enemy takes from you by x2% for 20 seconds, up to x12%. |
 Werewolf Werewolf | – For every 5 Willpower purchased within range, you deal +[6.24]% increased damage while in Werewolf form. – Additional Bonus unlocked after 40 Willpower points are purchased in the glyph’s range: You gain 10% damage reduction while in Werewolf form. |
 Exploit Exploit | – For every 5 Dexterity purchased within range, you deal +[3.85]% increased damage to Vulnerable targets. – Additional Bonus unlocked after 25 Dexterity points are purchased in the glyph’s range: Dealing damage to a Vulnerable enemy increases your damage by x1% for 6 seconds, up to x10%. |
| – For every 5 Dexterity purchased within range, you deal +2.0% increased damage to Poisoned targets. – Additional Bonus unlocked after 25 Dexterity points are purchased in the glyph’s range: Poisoning damage effects last 33%[x] longer. | |
| – Critical Strikes with Werewolf Skills restore 2 Spirit. | |
| – After spending 75 Spirit, you deal 30%[x] increased damage for 5 seconds. |
Let’s break down each of these beneficial nodes and where our paragon points are positioned in each of the paragon boards we use. This part of the build is presented in order of importance – so if you do not have enough paragon points for use in your paragon tree, just slowly work towards each step.
Starting Board
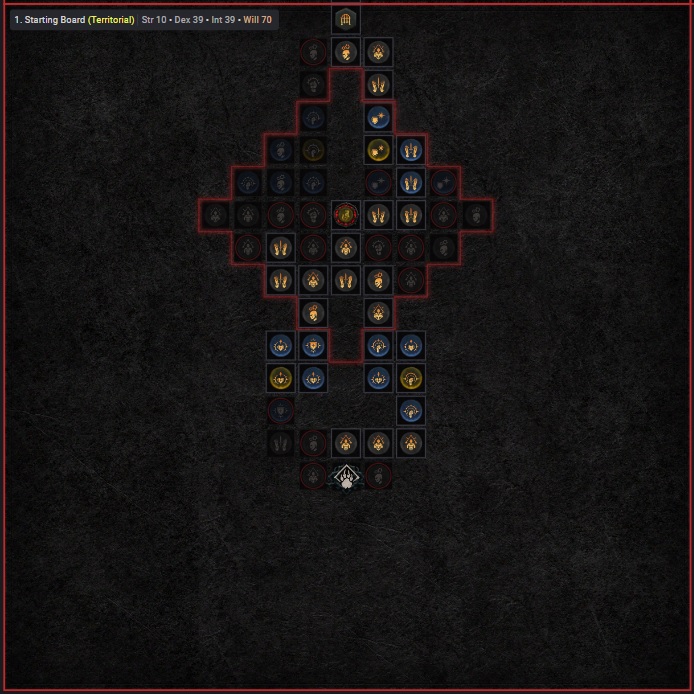
- Head up the right hand side and pick up the Rare Node
 Prime. This will give us some flat damage and an increase to our Maximum Life.
 - Next, continue towards the open Glyph slot and insert
 Territorial. The main purpose of this Glyph is to increase our offenses and defenses against Close Enemies.
 - Inside of the Glyph radius pick up Rare Node
 Resolve.
 - Be sure to collect the
 Dexterity Nodes beside
  Resolve to complete the bonus for
  Territorial.
 - Head down on the left side and pick up the Rare Node
 Tenacity. These nodes will boost our Maximum Life and Armor
 - Finally, head to the top of the board and attach our next Paragon Board, Heightened Malice.
Heightened Malice
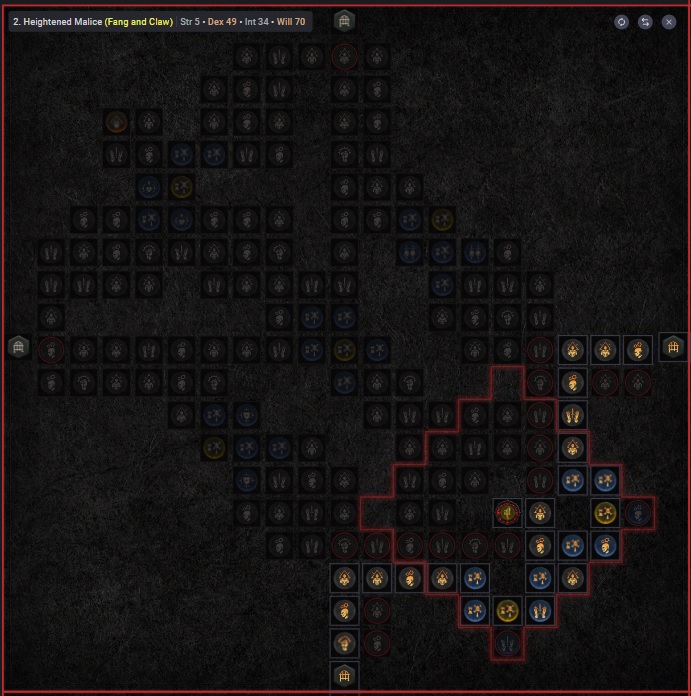
- First, head towards the Rare Node
 Sinking Fangs and the magic nodes around it for the increased damage to poisoned enemies.
 - Continue towards the open glyph node. Insert our next glyph,
 Fang and Claw.
 - Now take
 Nature-born inside the glyph radius. This node and the magic nodes around it will increase our Damage Reduction from poisoned enemies.
 - Head towards the right side of the Board and attach our next Paragon Board, Thunderstruck.
Thunderstruck
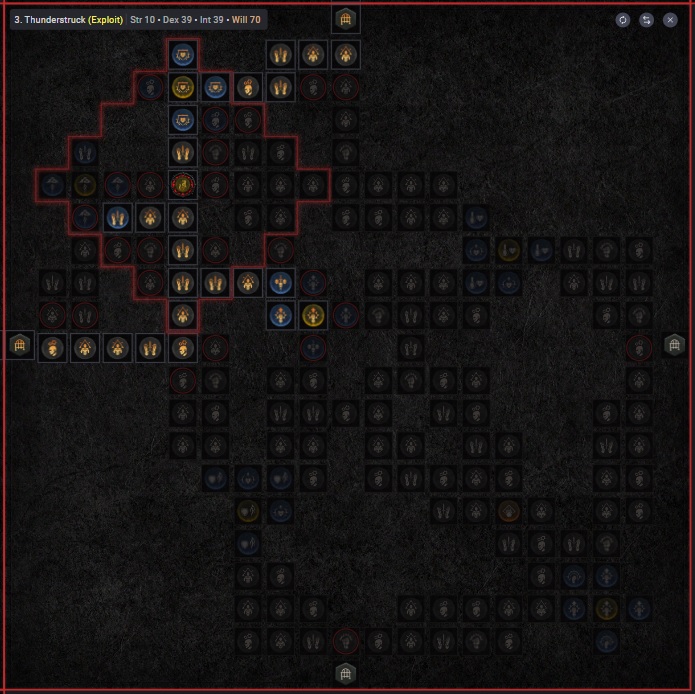
- Take the pathway towards the open glyph slot, picking up the Rare Node
 Deluge. This will increase our Critical Strike Damage.
 - Move towards the glyph slot on this board and insert the glyph
 Exploit. This glyph adds to our damage against Vulnerable targets.
 - Next off the nodes inside the glyph radius, ensuring you have both Rare Node
 Hubris. This node will grant us Damage Reduction against Vulnerable enemies.
 - Now head to the top of the Paragon Board and attach Ancestral Guidance.
Ancestral Guidance
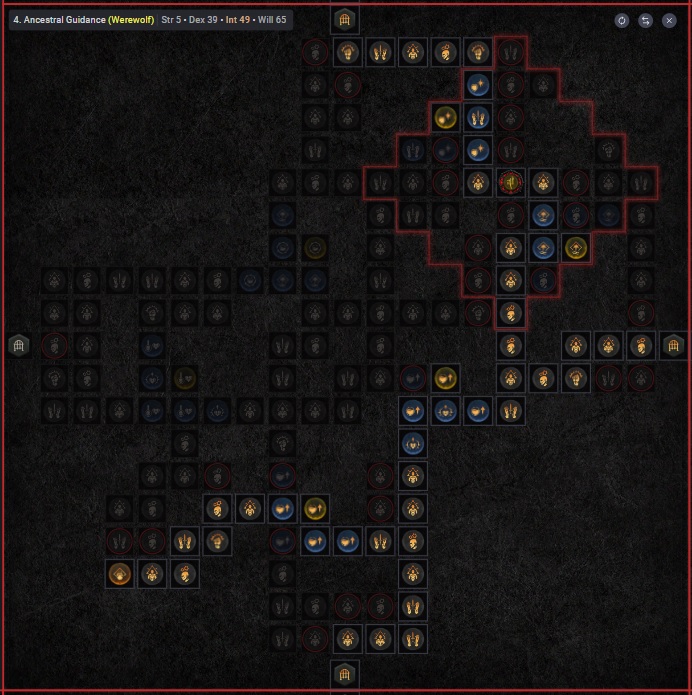
- Take the left pathway to pick the Rare Node
 Reclamation for Spirit on Kill.
 - Continue onwards to the Legendary Node
 Ancestral Guidance and take it.
 - Now path towards the empty glyph slot, picking up the Rare Node
 Natural Attunement along the pathway.
 - Head towards the glyph slot and insert
 Werewolf. This will grant us more damage while in Werewolf form.
 - Now take both Rare Nodes
 Harmony and
  Resolve, these nodes will boost our Core Skills damage and increase our Resistances.
 - Finally, complete both pathways to the top and left connection points. The left connection point will be used later; take the top connection point and attach Constricting Tendrils.
Constricting Tendrils
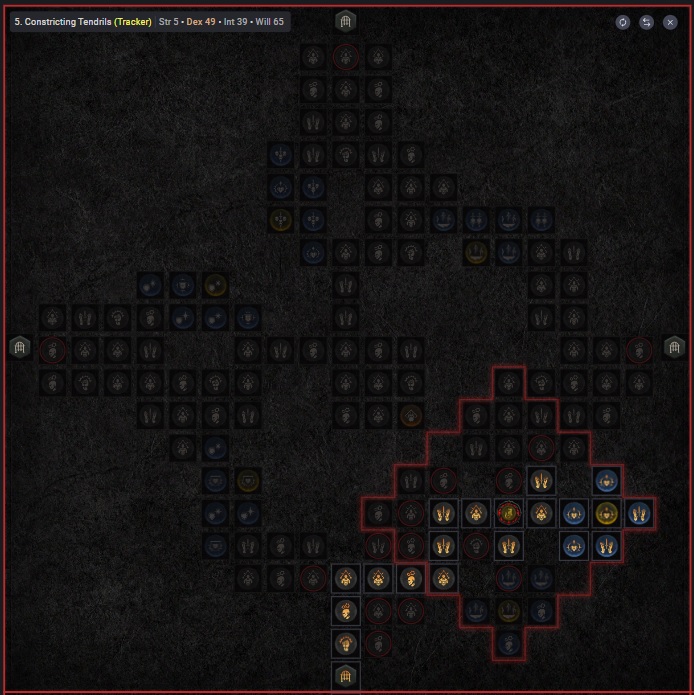
- Take the short pathway towards the open glyph slot and insert
 Tracker. This glyph will increase our damage to Poisoned enemies.
 - Now take the Rare Node
 Courage for the boost to Maximum Life.
 - Now return the paragon board Ancestral Guidance and take the left side connection point, adding the Paragon Board Lust for Carnage.
Lust for Carnage
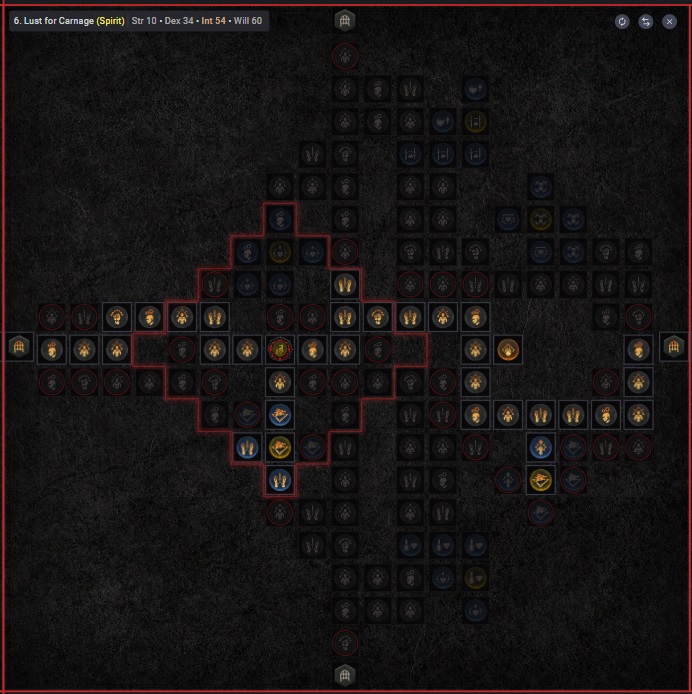
- Take the pathway towards the glyph slot, and add the glyph
 Spirit. This will boost our Critical Strike Damage.
 - Next move toward the Rare Node
 Feral, adding to our Werewolf damage.
 - Now take the pathway to the Legendary Node
 Lust for Carnage and take it.
 - Follow the pathway to the next Rare Node
 Ferocity and continue along the path to the left hand connection point.
 - Take the attachment point on the left hand side of the board and attach our final board, Inner Beast.
Inner Beast
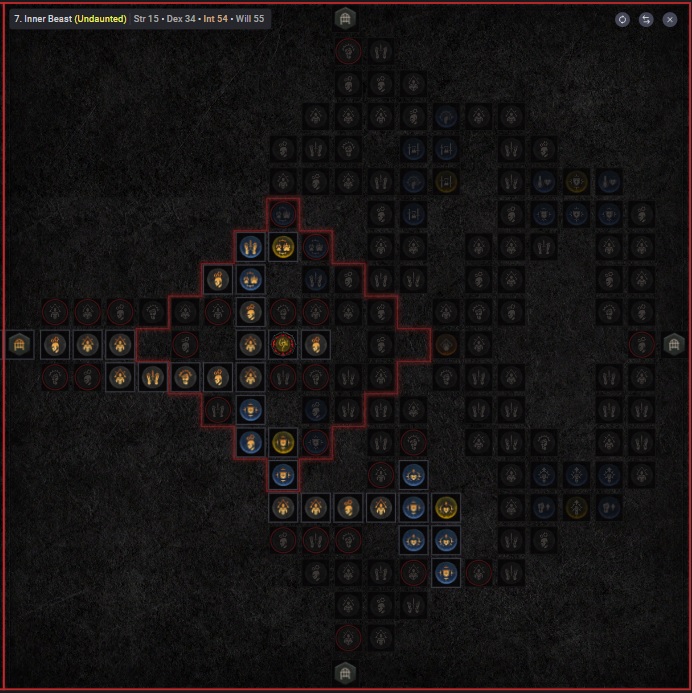
- Path towards the glyph slot and insert
 Undaunted, be sure to take all the
  Intelligence nodes for the bonus damage while Fortified.
 - Take both Rare Nodes
 Shapeshifter and
  Determination, increasing damage while shapeshifted and Armor.
 - Our last step is the Rare Node
 Tenacity. Select the Magic Nodes for the bonus Maximum Life and Armor. This paragon tree is now fully complete.
Paragon Board images courtesy of d4builds.gg.
Build Mechanics
The Poison Shredder build utilizes the Core Skill  Shred as our primary source of damage. Shred builds its damage through the combination of a three-staged attack. The initial stage dashes towards targets in a forceful engagement to strike for 43% skill damage. The attack continues with a second simple strike for 60% skill damage, and ends with a larger finishing move that strikes for 119% skill damage as a cone attack in front of your character.
This build focuses on further developing the damage of the  Shred with bonuses provided by
  Enhanced Shred and
  Primal Shred. These two extended skill properties provide the build with the following benefits:
- Increased attack speed.
- A 1% Life heal per enemy struck.
- An increase to critical damage dealt.
When you combine these benefits with a high chance to critical strike and an ample supply of Spirit, the build really comes alive.
However, this build truly shines in the endgame once you add the  Aspect of the Blurred Beast. This legendary Aspect pairs with the
  Primal Shred enhancement of
  Shred allowing you to “flicker” towards enemies and trigger an eruption of poison – causing any poison DoTs (damage over time) to be dealt instantly. This deals a significant amount of damage to all poisoned enemies your Shred dashes into.
The other main element of this build is the  Shepherd’s Aspect. This aspect grants us a multiplicative damage increases per companion that we have out on the field. Due to this, we can gain a very large damage increase, by adding
 ![]() Brutal Ravens and
Brutal Ravens and  Aspect of the Stampede for additional companions. We aslo use
  Shepherd’s Aspect on a two-handed weapon to amplify the effect by 100%, granting us a 20% damage bonus per companion at maximum value.
When this build is complete, you will have a toxic werewolf that flickers through packs of standard enemies and elite mobs dealing huge amounts of triggered Poison damage as you leap from pack to pack, chaining your deadly attacks across any map or dungeon.
Playstyle
The Poison Shredder playstyle jumps in and out of action, leaping towards packs of enemies using a “flicker” style attack pattern to unleash the release of Poison damage instantly with the help of  Aspect of the Blurred Beast. However, using this Aspect takes a bit of finesse to truly master. Let’s review a simple, yet effective rotation of skills you will need to learn to master.
Begin by spreading your Poison across your surrounding enemies with  Poison Creeper.
  Shred can accomplish this as well, but is less effective. Now, we can deplete our Spirit by using our Shred ability to leap from enemy to enemy cut them down as we move through the dungeon. As you progress, use your
 ![]() Debilitating Roar to keep your defensives up and when you are depleted on Spirit, use your
Debilitating Roar to keep your defensives up and when you are depleted on Spirit, use your ![]() Trample to fill your Spirit back up.
Trample to fill your Spirit back up.
We have added ![]() Hunter’s Zenith to help regularly break our two Werebear skills out of their cooldowns and keep them at the ready. This works particularly well with
Hunter’s Zenith to help regularly break our two Werebear skills out of their cooldowns and keep them at the ready. This works particularly well with ![]() Trample, essentially granting us full Spirit whenever we need. By doing this, we have no need for a generator and can freely spam Shred against enemies. Simply repeat this process of
Trample, essentially granting us full Spirit whenever we need. By doing this, we have no need for a generator and can freely spam Shred against enemies. Simply repeat this process of ![]() Poison Creeper and
Poison Creeper and ![]() Shred, moving from enemy pack to enemy pack. The remaining companion abilities are there to benefit from the
Shred, moving from enemy pack to enemy pack. The remaining companion abilities are there to benefit from the  Shepherd’s Aspect, which grants a multiplicative increase per companion, so we make sure to have as many as possible.
 ![]() Ravens help boost our Critical Strike Chance and
Ravens help boost our Critical Strike Chance and ![]() Wolves help with single target damage. However, the majority of this builds DPS comes from our Shred benefitting from
Wolves help with single target damage. However, the majority of this builds DPS comes from our Shred benefitting from  Shepherd’s Aspect.
As for single targets or endgame bosses, you will follow the same pattern but add one additional move. Here is how that will look:
- Keep your Poisons up by using any one of our skills to initiate a Poison DoT.
- Step back from the target and use
 Shred to dash into the target. This will trigger the
  Aspect of the Blurred Beast, causing the Poison DoTs to trigger their damage all at once. However, now that it is just you and a boss, your Shred cannot dash or flicker to another group to reactivate the Aspect of the Blurred Beast again. This is when we add a new maneuver.
 - Refresh your Poison DoTs on the boss with another
 Shred attack, then use your dodge skill to jump back from the boss.
 - Re-engage with a new
 Shred attack, activating
  Aspect of the Blurred Beast once again.
This pattern of bouncing in and out from the boss will continue to make all of our Poison DoTs do their damage instantly.
Gear Choice and Stat Priority
As you begin to farm in World Tier 3 and 4, Rare and Legendary item drops will begin to appear with some regularity depending on your luck. We recommend saving the targeted Legendary items that have the needed Legendary aspects listed below. We also recommended to keep multiple copies of the build’s Aspects in your Stash for future upgrades.
As for the Rare items, you will need to inspect each one for targeted affixes for use in each specific slot and do your best to match the recommended rolls. We have listed our targeted affixes in order of importance. Check the chart below and make note of what affixes you are searching for when you see a Rare gear piece drop.
Season 2 Update (1.2.0): Critical Strike Damage and Vulnerable Damage affixes are changed to be additive with other damage increases. All additive damage increases of the same amount are equal in value, as long as their conditions are active.
| Gear Slot | Targeted Affixes |
|---|---|
| Helm | 1. Cooldown reduction 2. Willpower 3. Maximum Life 4. Needed Resistances |
| Chest | 1. Damage Reduction 2. Damage Reduction while Fortified 3. Damage Reduction to Close Enemies 4. Maximum Life 5. Willpower |
| Gloves | 1. Critical Strike Chance 2.  Shred Ranks Shred Ranks3. Attack Speed 4. Willpower 5. All Stats |
| Pants | 1. Damage Reduction 2. Damage Reduction while Fortified 3. Damage Reduction while Injured 4. Damage Reduction from Close Enemies 5. Lucky hit: Chance to Restore Life 6. Maximum Life |
| Boots | 1. Movement speed 2. Damage Reduction while Injured 3. Willpower 4. Needed Resistances |
| Amulet | 1. Cooldown reduction 2. Rank Up  Toxic Claws Toxic Claws3. Damage Reduction while Injured 4. Spirit cost reduction 5. Movement speed |
| Rings | 1. Critical Strike Chance 2. Lucky Hit Chance 3. Critical Strike Damage 4. Maximum Life 5. Resource Generation |
| Totem | 1. Cooldown 2. Critical Strike Chance 3. Damage Reduction while Fortified 4. Spirit Cost Reduction 5. Willpower |
| 2-Handed Weapon | 1. Willpower 2. All Stats 3. Damage To Close Enemies 4. Core skill Damage 5. Critical Strike Damage |
Please note we have left in the Affix recommendations on the gear slots we use Uniques items in, just in case you have not found them yet.
Please note that the affixes above are our recommended picks for this build, but other affixes could certainly work instead of the ones listed above, although they may not be optimal. Also, there are several very specific affixes that are required to make the build work, as follows:
- Critical Strike Chance. In our build showcase, we had this value close to 50% to help assist with Spirit generation with each Critical Strike.
- Cooldown Reduction. Cooldown Reduction is a very important affix when you use any companion abilities.
- Skill Rank-Ups. This build focuses on several skills having as high of a rank as possible. While you can overlook these affixes, understand that your skill will not operate the same as our skills in the build showcase.
Please note the recent Season One Balance changes have lowered the amount of Cooldown Reduction found on gear by 30%. This may cause this build to feel more sluggish while Cooldowns are finishing, we plan to revisit this once Season One begins.
A final point on acquiring the right affixes and Legendary Aspects, use your Obols to target farm them. Obols are awarded from many different activities in the game, you will always stockpiling them until you hit your maximum. Instead of just randomly spending them on a random pick, use them to target what you might be missing from this build. It is a great way to target a specific slot of loot and find what you need.
If you are interested in checking out a new tool for gambling Obols check out this article below from Icy Veins.
Obol Gambling Optimization ToolLegendary Aspects
Below you will find the optimal setup for Legendary Aspects for the Poison Shredder build. Each aspect is listed with its matching gear slot. Do your best to keep each aspect in the slot it was posted with.
Listed below are all the best-in-slot Aspects found on Legendary Items that are important for the Poison Shredder Druid build. Aspects from the Codex of Power can be used if you cannot find the proper Legendary drops, but they have weaker effects. Extract Aspects from lower level Legendary Items and imprint them onto better Rare Items with preferred stats. The endgame itemization goal will be to imprint Aspects with the best values Ancestral Rare items with Item Power above or as close to 800, then upgrade them through the Blacksmith.
| Gear Slot | Legendary Aspect | Legendary Aspect Power |
|---|---|---|
| Helm |  Vigorous Aspect Vigorous Aspect | Gain [10.0 – 15.0%] Damage Reduction while Shapeshifted into a Werewolf. |
| Chest |  Aspect of Disobedience Aspect of Disobedience | You gain [0.6 – 1.1%] increased Armor for 4 seconds when you deal any form of damage, stacking up to [33.00 – 66.00%]. |
| Gloves |  Stormclaw’s Aspect Stormclaw’s Aspect | Critical Strikes with  Shred deal [20 – 30%] of the damage dealt as Lightning damage to the target and surrounding enemies. Shred deal [20 – 30%] of the damage dealt as Lightning damage to the target and surrounding enemies. |
| Pants | ||
| Boots |  Ghostwalker Aspect Ghostwalker Aspect | While Unstoppable and for 4 seconds after, you gain [10 – 25]% increased Movement Speed and can move freely through enemies. |
| Amulets(50% bonus) |  Aspect of the Blurred Beast Aspect of the Blurred Beast | While dashing, |
| Ring | ||
| Ring |  Aspect of the Stampede Aspect of the Stampede | Gain 1 additional Companion. In addition, your Companion Skills deal [16-26%] bonus damage. |
| Two-handed Weapon(100% Bonus) |  Shepherd’s Aspect Shepherd’s Aspect | Core Skills deal an additional [6 – 10]% damage for each active Companion. |
Uber Uniques
The chart below is our recommendation for Uber Uniques that will work within this build. However, all Uber uniques are extremely powerful and can shine in different situations. Good hunting!
| Uber Uniques | Recommended(Y/N) | Replaces |
| Yes (2nd) |  Vigorous Aspect gets dropped Vigorous Aspect gets dropped | |
| Yes (1st) |  Vigorous Aspect gets dropped Vigorous Aspect gets dropped | |
| No | ||
| No | ||
| No | ||
| No | ||
| No |
Gems
Listed below are the best gems to socket into gear for each slot type.
- Weapon:
 Royal Emerald for critical strike damage to Vulnerable enemies.
 - Armor:
 Royal Ruby for increase to Maximum Life.
 - Jewelry:
 Royal Diamond for All Resistances, however, certain bosses may require you to switch to their corresponding resistances.
Elixirs and Health Pots
Visit the Alchemist in any main town to craft helpful Elixirs that increase stats, and experience gain for 30 minutes. Make sure to forage plants and pick up the necessary crafting materials during your adventures; they randomly spawn around the world. Use an Elixir providing any Resistance you need most, or the ![]() Assault Elixir to increase Attack Speed.
Assault Elixir to increase Attack Speed.
Return to the Alchemist again when you reach Level 20, 30, 45, 60, 70, 80 and 90, to upgrade your potion. The extra healing is essential to survival.
Changelog
- March 5th 2024: Updates for Patch 1.3.3
- January 20th 2024: Season 3 speculative changes.
- December 1st 2023: Build overhaul for performance.
- October 13th 2023: Build Adjusted to prepare for Season 2 launch.
- August 10th 2023: Updated full build for Season 1.
- August 8th 2023: Added notes about Patch 1.1.1.
- August 4th 2023: Updated Hearts and Paragon sections for clarity.
- July 19th, 2023: Season of the Malignant section added.
- July 18th, 2023: Reviewed and altered build with Season 1 Patch Notes.
