


Build Introduction
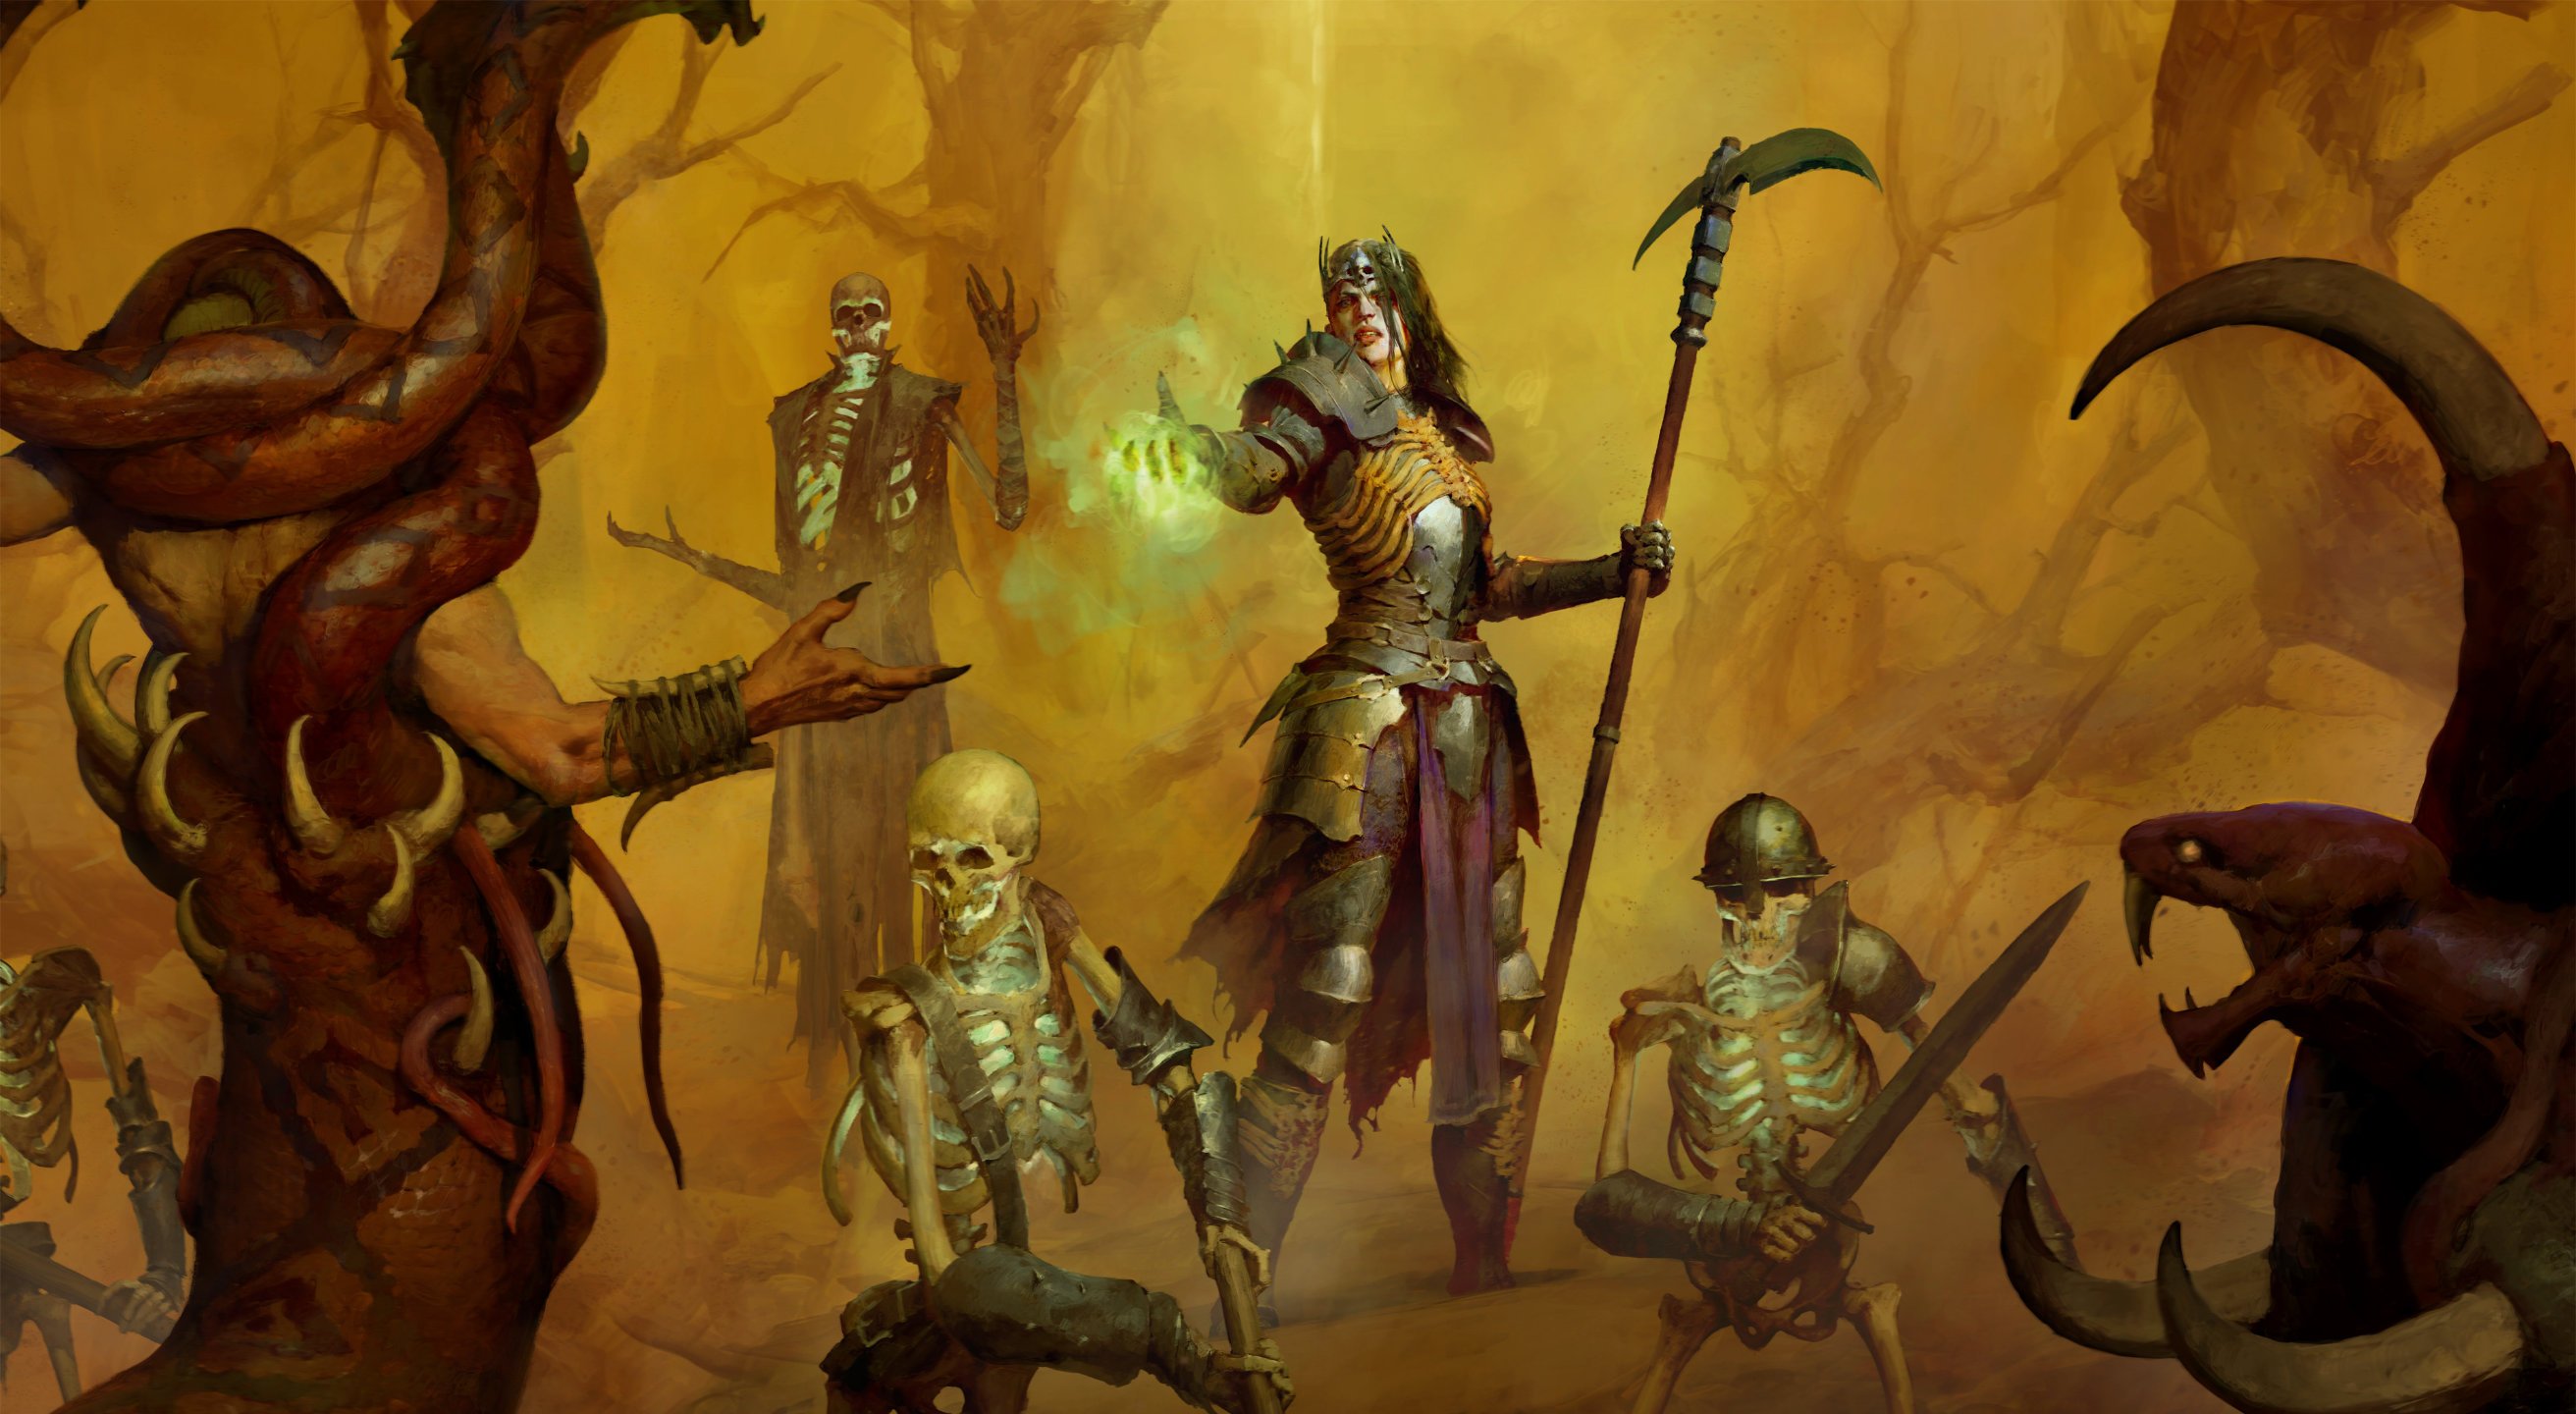
This guide is a collaboration between GhazzyTV and community member Garm Z. The ![]() Sever Shadowmancer build is a well-rounded and high-performing leveling build at any stage of the progress, with the most powerful damage scaling aspects available. The build starts with minions for tanking and essence management, same as damage supplement, until the signature
Sever Shadowmancer build is a well-rounded and high-performing leveling build at any stage of the progress, with the most powerful damage scaling aspects available. The build starts with minions for tanking and essence management, same as damage supplement, until the signature  Reaping Lotus’ Aspect and a few other aspects are discovered.
Quick Navigation
Allocation of Skill Points


Removing Minions
It’s recommended to switch away from minions as soon as you get access to ![]() Soulrift,
Soulrift, ![]() Affliction, and you have the Reaping Lotus’ Aspect, and Essence Management is solved with Essence per Second modifiers on gear and/or by utilizing the
Affliction, and you have the Reaping Lotus’ Aspect, and Essence Management is solved with Essence per Second modifiers on gear and/or by utilizing the ![]() Cir +
Cir + ![]() Lum Runeword. We do recommend looking at the Recommended Legendary Aspect list for more information on powers.
Lum Runeword. We do recommend looking at the Recommended Legendary Aspect list for more information on powers.
The skill-tree will change slightly when you sacrifice your minions. This means we remove all 3 points from both ![]() Skeletal Warrior Mastery,
Skeletal Warrior Mastery, ![]() Skeletal Mage Mastery, as well as
Skeletal Mage Mastery, as well as ![]() Hellbent Commander. We also remove 1 point from
Hellbent Commander. We also remove 1 point from ![]() Acolyte’s Reap granting us a total of 10 free points. These 10 points will then be spent in:
Acolyte’s Reap granting us a total of 10 free points. These 10 points will then be spent in: ![]() Stand Alone,
Stand Alone, ![]() Memento Mori,
Memento Mori, ![]() Titan’s Fall, and the last point goes to Rank 3 of
Titan’s Fall, and the last point goes to Rank 3 of ![]() Necrotic Carapace! We also switch out the
Necrotic Carapace! We also switch out the ![]() Supernatural Sever to
Supernatural Sever to ![]() Paranormal Sever!
Paranormal Sever!
Skill Bar and Skill Tree Points
Our skill-bar will change a bit during our progression, below you’ll find a list of these events:
- When you get access to
 Soulrift, it will replace your
  Reap on the bar.
 - When you reach the progression point to switch out your
 Raise Skeleton you will replace that skill with Reap.
 - When you get access to
 Blight, according to the above progression, you’ll replace Reap with it!
To prepare yourself for what happens after level 60 when you get access to your Paragon Board, head over to our Necromancer Builds page and choose your weapon!
Necromancer Class Mechanic – Book of the Dead
Necromancer’s class-specific ability is the Book of the Dead, which provides three different type of minions that unlock by leveling up. This build is designed around using all of your minions from this system during the early stage of leveling. However, during your progression we will be sacrificing them all.
Before you sacrifice your minions we’ll use the following:
- Melee Skeletons: Defenders [Upgrade #2] – This makes our melee minions insanely resilient. If resistances are capped we can sacrifice Reapers for more Shadow damage.
- Mage Skeletons: Cold Mages [Upgrade #1] Essence generating skeletons will help sustain our essence pool.
- Golem: Bone [Sacrifice] – Provides increased Attack Speed.
When it’s time to sacrifice them it will look like this:
- Melee Skeletons: Defenders [Sacrifice] – Gives us all resistances.
- Mage Skeletons: Cold Mages [Sacrifice] Increases our Vulnerable damage.
- Golem: Iron [Sacrifice] – Provides increased Critical Strike Damage.
Gear, Stats, Gems, and Runes
Prioritize a higher total damage output when it comes to your weapon, as the higher it is, the better. Important to point out that we always want to be wielding a 2H weapon with this build. Make sure you check the aspects listed below to have a smooth leveling experience.
Legendary Item Aspects
To unlock Aspects in the Codex of Power, you must find them or complete the corresponding Dungeon where the specific Aspect drops. Visit the Occultist to imprint this Aspect onto an item. Aspects from the Codex of Power can be used often on weapons. Spending time in Helltides can be very helpful to get ![]() Veiled Crystal, and Salvaging items provides more material you’ll need to upgrade and put Aspects on items.
Veiled Crystal, and Salvaging items provides more material you’ll need to upgrade and put Aspects on items.
There’s only one available aspect power you can find in a dungeon that will scale the build a lot, and that is the Aspect of the Damned which you’ll find in Uldur’s Cave in Kehjistan. From random drops, you’ll find the strongest Aspect for this build which is: Reaping Lotus’ Aspect. For the build to perform the best, we’ll always want to have  Aspect of the Cursed Aura, which, again, is a drop only aspect.
A list of sought-after legendary powers, BEFORE YOU SACRIFICE YOUR MINION, you need to look out for as you progress, looks like this:
| Aspect Name | Legendary Aspect Power | Source |
| Aspect of Occult Dominion (Utility) | Your maximum number of Skeletal Warriors and Skeletal Mages is increased by 2. | Random Drop |
 Aspect of Hardened Bones Aspect of Hardened Bones(Defensive) | You and your Minions gain 10-30% increased Damage Reduction | Random Drop |
| Aphotic Aspect | Skeletal Priests empower your Skeletal Warriors’ attacks do deal Shadow Damage and have x% chance to Stun enemies for 1.5 seconds. | Random Drop |
| Blood Getter’s Aspect | Your Skeletal Priests also empower you at 55-75% effectiveness. | Random Drop |
 Aspect of Slaughter Aspect of Slaughter(Mobility) | You gain 20% Movement speed. Lose this bonus for 5-2 seconds after taking damage from a Close Enemy. | Random Drop |
| Aspect of the Cursed Aura (Utility) | A dark aura surrounds you, inflicting Decrepify and Iron Maiden on enemies who touch it. Curses inflicted this way spread to surrounding targets every x seconds and last 4 seconds outside the aura. | Random Drop |
| Aspect of Frenzied Dead (Offensive) | Each time one of your Minions damages an enemy, they gain % Attack Speed for 3 seconds up to X%. | Random Drop |
 Aspect of the Great Feast (Offensive) Aspect of the Great Feast (Offensive) | Gain x% Summoning damage, but each active Minion drains 1 Essence from you per second. Note: You will need Essence per Second modifiers on your gear (at least 2) to sustain your Essence using this Aspect. | Random Drop |
| Aspect of Grasping Veins (Offensive) | Gain #% Increased Critical Strike Chance for 6 seconds when you cast Corpse Tendrils. You deal x#% bonus Critical Strike Damage to enemies damaged by Corpse Tendrils for 6 seconds. | Corrupted Grotto in Kehjistan |
| Reaping Lotus’ Aspect (Offensive) | Sever no longer returns and instead splits into 3 specters that expand out and back from its apex. Sever deals #% of normal damage. | Random Drop |
| Aspect of Reanimation (Offensive) | Your Minions gain increased damage while alive, up to x#% after 10 seconds. | Campaign in Scosglen |
Changing Aspect costs ![]() Veiled Crystal, which is easily farmed in Helltides. The order of priority for what aspect to have on your weapon and amulet is listed below:
Veiled Crystal, which is easily farmed in Helltides. The order of priority for what aspect to have on your weapon and amulet is listed below:
- Aspect of Reanimation
- Aspect of the Damned
- Reaping Lotus’ Aspect
- Aspect of the Great Feast
- Aspect of Frenzied Dead
- Aspect of Grasping Veins
A list of sought-after legendary powers, WHEN YOU HAVE SACRIFICED YOUR MINION, you need to look out for as you progress, looks like this:
| Aspect Name | Legendary Aspect Power | Source |
| Aspect of the Cursed Aura (Utility) | A dark aura surrounds you, inflicting Decrepify and Iron Maiden on enemies who touch it. Curses inflicted this way spread to surrounding targets every x seconds and last 4 seconds outside the aura. | Random Drop |
| Reaping Lotus’ Aspect (Offensive) | Sever no longer returns and instead splits into 3 specters that expand out and back from its apex. Sever deals #% of normal damage. | Random Drop |
| Aspect of Slaughter (Mobility) | You gain 20% Movement speed. Lose this bonus for 5-2 seconds after taking damage from a Close Enemy. | Random Drop |
| Sacrificial Aspect | Your Sacrifice bonuses are increased by x35-55%. | Ruin’s of Eridu in Hawezar |
| Aspect of the Great Feast (Offensive) | Gain x% Summoning damage, but each active Minion drains 1 Essence from you per second. Note: You will need Essence per Second modifiers on your gear (at least 2) to sustain your Essence using this Aspect. | Random Drop |
| Aspect of Grasping Veins (Offensive) | Gain #% Increased Critical Strike Chance for 6 seconds when you cast Corpse Tendrils. You deal x#% bonus Critical Strike Damage to enemies damaged by Corpse Tendrils for 6 seconds. | Corrupted Grotto in Kehjistan |
| Aspect of the Damned (Offensive) | You deal x#% increased Shadow damage to enemies afflicted by any Curse. | Uldur’s cave in Kehjistan |
| Sacrificial Aspect (Offensive) | Your Sacrifice bonuses are increased by x#% | Ruins of Eridu in Hawezar |
Changing Aspect costs ![]() Veiled Crystal, which is easily farmed in Helltides. The order of priority for what aspect to have on your weapon is listed below:
Veiled Crystal, which is easily farmed in Helltides. The order of priority for what aspect to have on your weapon is listed below:
- Reaping Lotus’ Aspect
- Aspect of the Damned
- Aspect of the Great Feast
- Aspect of Grasping Veins
- Sacrificial Aspect
For your amulet, the order of priority is the following:
We have a dedicated in-depth Aspect and Codex of Power guide that you can check out for more information.
Stat Priority and Tempering Affixes
Keep in mind that this is only possible if you’ve found tempering manuals as you progress through this leveling guide. There are really not many modifiers worth bothering with during the leveling stage, but the recommendation is the same as our stat priority listed above for defenses such as Life and armor. For offensive scaling, you’re only looking for summoning damage or specific minion damage, such as Skeletal Mage damage.
When it comes to modifiers on your gear as you progress this build, you’ll be looking for the following stats:
- Essence per Second – This is the most important modifier and you should consider using the Occultist in town to enchant ALL your items with this modifier where possible.
- + Ranks to Core Skills
- + Ranks to Sever
- Resistance to All Elements
When it comes to Tempering affixes, it all depends on whether or not you’ve dropped the Tempering Manual for them. Below you’ll find a list of attractive temper modifiers for this build:
- Total #% Armor
- Corpse Tendril #% Size
- Soulrift Duration
- Damage Reduction for Minions
- Sever #% Size
- Ultimate Cooldown Reduction
- Lucky Hit: Restore Essence
Gems and Runewords
Listed below are the best Gems and Runes to socket into gear for each item type.
Gems
As of Season 9, we will want to use Horadric Jewels as soon as you gain access to them. Till then, you’ll use the following ones:
- Weapon: We don’t recommend socketing anything in the weapon due to material cost and the fact that you’ll be switching your weapon so frequently during your level progression. If a socket exist on the item you could slot in a
 Emerald for increased Critical Strike Damage.
 - Armor:
 Topaz for increased Intelligence.
 - Jewelry:
 Skull to help reach the armor cap.
Runewords
When it comes to Runewords, there’s a couple this build could utilize well. The most attractive combination is: ![]() Cir +
Cir + ![]() Lum, this is extremely helpful with your Essence management. Other options are useful as well. Below you’ll see them described:
Lum, this is extremely helpful with your Essence management. Other options are useful as well. Below you’ll see them described:
 Yax +
Yax +  Lum – Every time you drink a potion you’ll also recover Essence.
 Feo +
Feo +  Ner – If you become Injured or Crowd Controlled you invoke the Rogue’s
  Countering Concealment gaining Dodge Chance, Movement Speed, Unstoppable and Stealth.
Make sure you place these in your Pants or Chest, as you’ll want to keep your weapon slot open to be replaced should you find one with higher item power.
Horadric Spells and Jewels (Season 9)
In Season 9, we will have access to Horadric Jewels and Horadric Spells, granting some absolutely crazy abilities that we’ll utilize to enhance our build’s power. Below, you’ll find a list of the recommended powers we use for this build.
Horadric Spell
| Type | Power | Description |
| Catalyst | Shape an Ethereal Column that Taunts for x seconds. Piercing waves flow from it and deal x% damage, until you create another one of move too far away. The Taunted enemies become Vulnerable and move faster. | |
| Infusion | Your Spell Catalyst now deals Shadow and or Corrupting damage. Enemies hit by it deal x% reduced damage for 7 seconds. While equipped, your Shadow Damage Bonus is equal to that of your highest Damage Type Bonus. At Rank 5 it will deactivate enemy monster summoner effects for 5 seconds. | |
| Arcana | Your Catalyst gains a specialized Execute effect for non-Boss enemies with 20% or less Life. Bloody Charm will also execute non-boss enemies with Cosmic Anomaly implosions. Successful executions increase your Attack Speed by 20% for 8 seconds. | |
| Arcana | Invoking your Catalyst grants Unstoppable for 5 seconds whenever it activates. | |
| Arcana | Your Catalyst increases your Movement Speed by 70% during its effect and for 5 more seconds after it ends. |
Horadric Jewels
Use these Jewels over regular gems in your jewelry slots to further enhance the build:
Keep in mind that you probably will not find any jewels while leveling. They are much easier to get once you are in the endgame.
Mercenaries
Raheir is a great choice with increased resistances for you. The mercenaries are a nice addition to the game, and whichever you choose to run is up to you. The recommendation for this build will be to run Raheir. We also recommend using the Reinforcement slot to level up all your mercenaries to get access to the caches for extra loot.
Below you’ll find the recommended skill set-up for Raheir:
Build Mechanics
Rotation and Playstyle
Before we sacrifice our ![]() Raise Skeleton they pretty much just act as meat-shields for us and generate some Essence. All you have to do is resummon new ones should any die and cast the ability again with max summons to heal them and buff their damage output. The rotation described below will be handled the same both before and after sacrificing them.
Raise Skeleton they pretty much just act as meat-shields for us and generate some Essence. All you have to do is resummon new ones should any die and cast the ability again with max summons to heal them and buff their damage output. The rotation described below will be handled the same both before and after sacrificing them.
Our main source of damage comes from casting ![]() Sever until we produce a corpse. You could open up a fight by using
Sever until we produce a corpse. You could open up a fight by using ![]() Blood Mist for ~1sec to generate a corpse. This is then followed-up with
Blood Mist for ~1sec to generate a corpse. This is then followed-up with ![]() Corpse Tendrils to group enemies together. With enemies grouped up, it’s the perfect time to cast
Corpse Tendrils to group enemies together. With enemies grouped up, it’s the perfect time to cast ![]() Bone Prison as well as
Bone Prison as well as ![]() Blight to ramp up damage scaling and restore Essence. Now it’s time to unleash your damage with
Blight to ramp up damage scaling and restore Essence. Now it’s time to unleash your damage with ![]() Sever.
Sever. ![]() Soulrift is used as often as possible to help Essence management and increase damage output as well as providing a defensive barrier.
Soulrift is used as often as possible to help Essence management and increase damage output as well as providing a defensive barrier.![]() Blood Mist doesn’t have to be used as an offensive tool, it can also save you if you find yourself in a tight spot!
Blood Mist doesn’t have to be used as an offensive tool, it can also save you if you find yourself in a tight spot!
Which Elixirs Should You Use?
To gain an edge in your adventures, head to the Alchemist in any major town, and craft Elixirs that enhance your stats and experience gain for 30 minutes. Remember to gather the necessary crafting materials by foraging plants. Select any Elixir as that provides extra experience gain, or if you have ![]() Elixir of Advantage to help with attack speed.
Elixir of Advantage to help with attack speed. ![]() Elixir of Iron Barbs can help early game with reaching the 1000 armor cap as well.
Elixir of Iron Barbs can help early game with reaching the 1000 armor cap as well.
Return to the Alchemist again around every 10 levels to upgrade your potion. The extra healing is essential to survival.
Season 9 Updates
For a complete overview of Season 9, mechanics and theme, new leveling activity, and other changes coming, please take a look at our comprehensive season hub here.
Additionally, Season 9 isn’t changing anything notably for the build outside of providing the new Horadric powers.
Difficulty and Endgame
This guide is designed to get you to level 60 in a smooth and enjoyable way. Once there, you’ll want to look at a proper endgame-designed build guide. Make sure you pick one of our recommended ones!
Changelog
- July 3rd, 2025: Optimizations across the board in the guide.
- June 29th, 2025: Guide updated for Season 9.
- May 5th, 2025: Optimized and updated post launch for Season 8.
- April 29th, 2025: Guide updated for Season 8.
