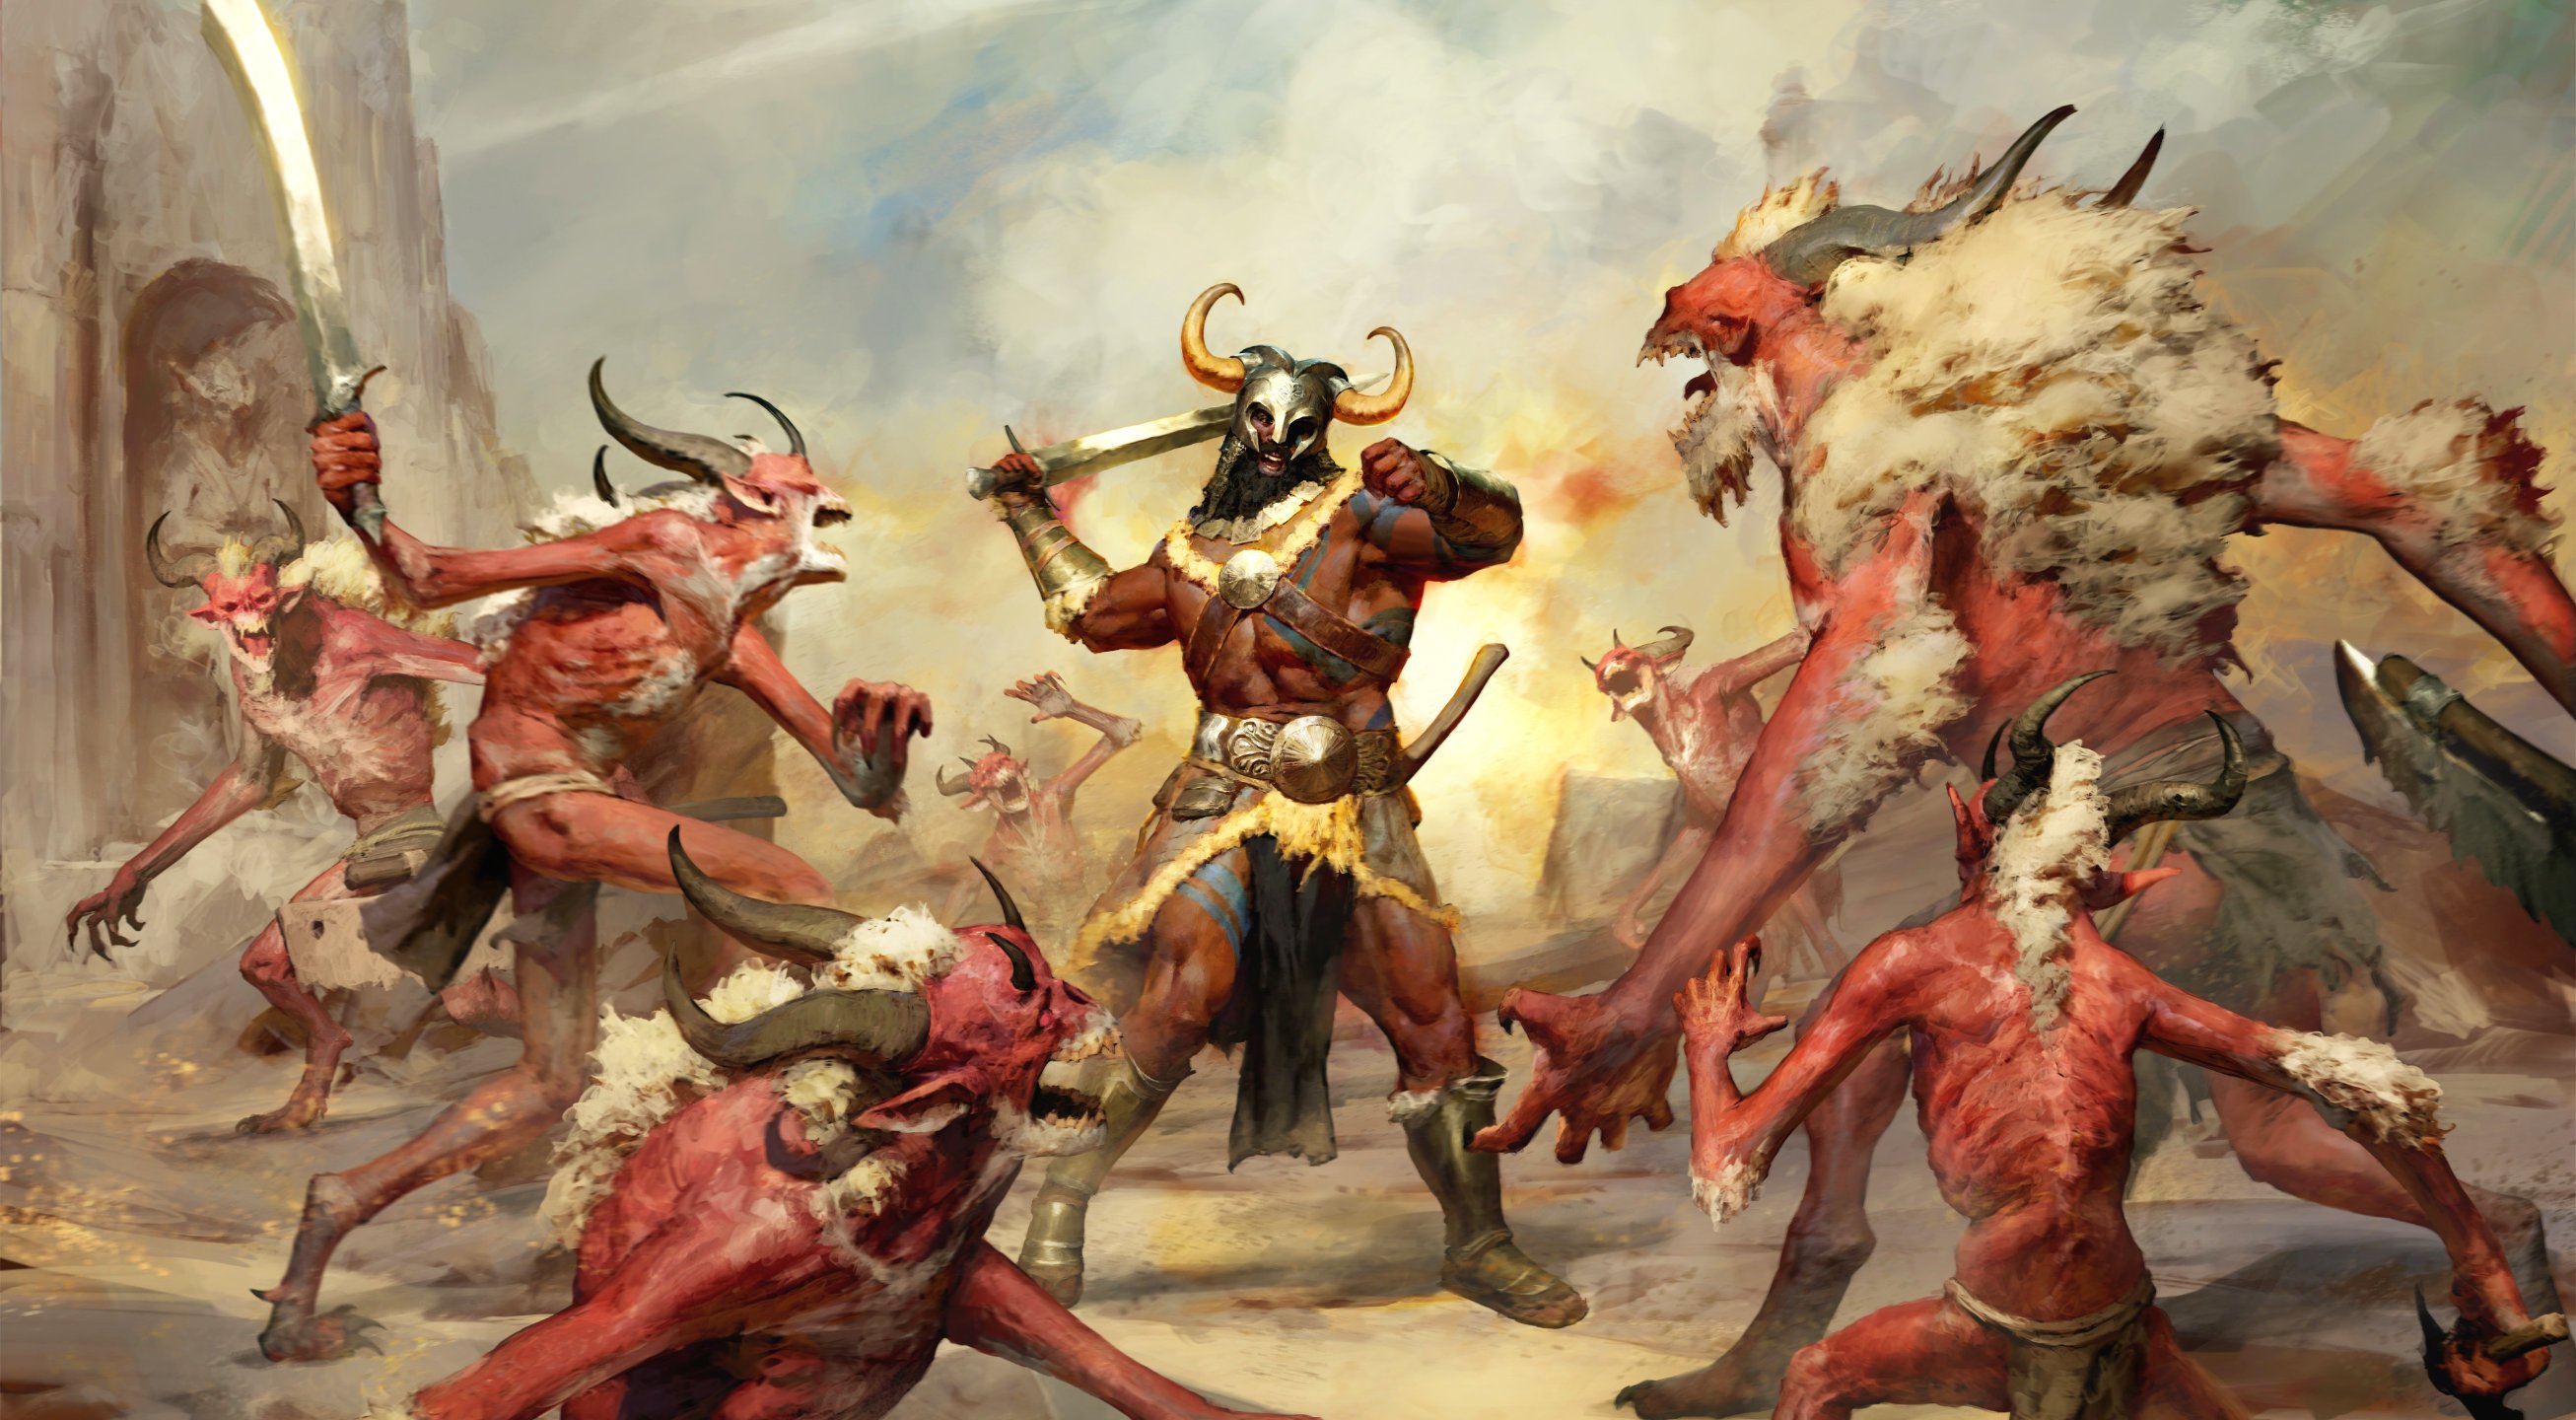


Build Introduction
The point of this leveling guide is to quickly take your character from Level 1 to 60 while using the  Upheaval skill and prepare you for to easily transition into our Upheaval Endgame Build. This guide will review skill point placement as you level from 1 – 60, explaining the purpose and how each passive and skill work together to create power to tackle whatever leveling format you choose. We will also discuss which Legendary Aspects, Affixes, Gem, and Elixirs we can utilize for purposes of accelerating the leveling process.
Our primary skills in this build are  Lunging Strike as our primary Fury Generator. We augment this skill using:
- Enhanced Lunging Strike – The major benefit to this augment is the opportunity to heal.
- Combat Lunging Strike – This helps us maintain a state of Berserking through the use of Critical Strikes, it can be used as a trigger or as a way to extend the Berserking buff longer.
Our Core skill in this is Upheaval. This is our primary spender and what we will be using to smash our enemies into oblivion. We augment this skill using:
- Enhanced Upheaval – The Stun effect can break up combat and offer us the chance to reposition or remove ourselves from a bad situation.
- Violent Upheaval – As with our previous skill, we are focusing on our state of Berserking, being in Berserk will be a key component to this build.
Now that we understand our two most basic skills, our Generator and Spender, we can look deeper into how we will be allocating our skill points as we journey from Level 1 to Level 60.
Quick Navigation
Allocation of Skill points
Below is the recommended order for spending your points as you level up. If you are missing skill points, complete Renown tiers 1-3 in every zone.
Skill Bar and Skill Tree Points
 Rallying Cry
  War Cry
  Leap
Leap  Wrath of the Berserker Lunging Strike Upheaval
 If you are unsure how to best use these skills, read our Build Mechanics section after setting up your skill bar.
Wondering what comes after level 60 or which paragon boards to choose? Head to the Barbarian Builds Page and choose an endgame build to continue progressing your character beyond level 60 and into the endgame.
Barbarian Class Mechanic – The Arsenal System
The Barbarian is unique among classes in Diablo 4. As a master of weapons and combat it can wield four different weapons simultaneously and effortlessly swap between them when we use different skills. We have a Two-Handed Bludgeoning Weapon, a Two-Handed Slashing Weapon, and a pair of Dual-Wield Weapons. At level 15 a quest becomes available in Ked Bardu called “Masters of Battle” given by Forgemaster Kerdi. After you complete this short quest chain, you gain access to the second part of the Arsenal System. Weapon Techniques.
Barbarians gain various bonuses by using specific weapon types that are only active while wielding those weapons. After unlocking the Weapon Technique class feature you can choose ANY weapon type and slot it into your technique slot and that bonus will always be active no matter what weapon you’re actually using.
For this ![]() Upheaval build we will be using the Two-Handed Axe technique for its bonus damage to vulnerable enemies.
Upheaval build we will be using the Two-Handed Axe technique for its bonus damage to vulnerable enemies.
Keep in mind that while you will always benefit from the Two-Handed Axe bonus once it’s slotted in your technique slot, you will still gain the bonuses of the weapon types you’re actually wielding as well letting you gain more power through this system.
Finally, Barbarians can assign their skills to different weapons allowing for seamless transitions when using various skills. We want to assign ![]() Upheaval to our Two-Handed Bludgeoning weapon to benefit from the
Upheaval to our Two-Handed Bludgeoning weapon to benefit from the ![]() Wallop passive skill.
Wallop passive skill. ![]() Lunging Strike can be assigned to any weapon type as well as it isn’t our main source of damage. A small quality of life is to assign it to your Dual-Wield Weapons for their faster attacks so you can build resources faster but this is relatively minor.
Lunging Strike can be assigned to any weapon type as well as it isn’t our main source of damage. A small quality of life is to assign it to your Dual-Wield Weapons for their faster attacks so you can build resources faster but this is relatively minor.
Gear, Stats, Gems, and Runes
When selecting your items, higher item power generally indicates stronger gear, but you also need to consider the affixes and effects that are relevant to your class and build. When making gear decisions during leveling keep an eye on both the item power and the specific attributes that compliment the build.
Legendary Aspects
For general information on how to unlock the Codex of Power, head to our Aspects and Codex of Power guide. You can also imprint Aspects onto items by visiting The Occultist in town.
Listed below are all the aspects that are important to this build as well as what slot they are best placed in. However, you can move the slots around during the leveling process especially since early on some of these aspects can only be found via random drops and might not be on the most ideal slot.
| Gear Slot | Legendary Aspect | Legendary Aspect Power |
|---|---|---|
| Helm |  Aspect of Might Aspect of Might | Basic Skills grant 20% Damage Reduction for [2.0-6.0] seconds. |
| Chest | Aspect of Disobedience | You gain [0.6 – 1.1%] increased Armor for 4 seconds when you deal any form of damage, stacking up to [36 – 66%]. |
| Gloves |  Aspect of Sundered Ground Aspect of Sundered Ground | Every 20 seconds your next |
| Pants | Iron Blood Aspect | Gain [2.0-4.0%] Damage Reduction for each Nearby Bleeding enemy up to [10-20%] maximum. |
| Boots |  Relentless Berserker’s Aspect Relentless Berserker’s Aspect | Lucky Hit: Damaging an enemy with a Core Skill has up to a [22-40%] chance to extend the duration of Berserking by 1 second. Double this duration if it was a Critical Strike. |
| Amulets(50% bonus) |  Wind Striker Aspect Wind Striker Aspect | Critical Strikes grant [8.0-16.0]% Movement Speed for 1 second, up to 6 seconds. |
| Ring |  Aspect of Vocalized Empowerment Aspect of Vocalized Empowerment | Your Shout Skills generate [2.0-4.0] Fury per second while active. |
| Ring | Aspect of Voracious Rage | Killing an enemy with a Core Skill refunds [10.0-20.0%] of its base Fury cost. Can only happen once per Skill cast. |
| Bludgeoning Weapon (200% bonus) | Aspect of the Expectant | Attacking enemies with a Basic Skill increases the damage of your next Core Skill cast by [5-10%], up to 30%. |
| Slashing Weapon (200% bonus) | Edgemaster’s Aspect | Skills deal up to [10- 20%] increased damage based on your available Primary Resource when cast, receiving the maximum benefit while you have full Primary Resource. |
| Dual-Wield Weapon 1 | Aspect of Retribution | Distant enemies have a 8% chance to be Stunned for 2 seconds when they hit you. You deal [10-20]%[x] increased damage to Stunned enemies. |
| Dual-Wield Weapon 2 | Rapid Aspect | Basic Skills gain [15-30%] Attack Speed. |
Stat Priority and Tempering Affixes
During your leveling journey, you may stumble across items with incredible affixes. Tempering these items can provide you with a significant boost in power, so make sure you understand how tempering works!
As a reminder, tempering is only possible if you’ve found the tempering manuals while leveling.
Keep an eye out for the following stats that are beneficial for this build. We will list the most ideal stats and the best tempering affixes if you’re lucky enough to find the relevant manual.
| Gear Slot | Targeted Affixes | Tempering Affix |
|---|---|---|
| Helm | 1. Cooldown Reduction 2. Attack Speed 3. Maximum Life | Upheaval Size Maximum Life |
| Chest | 1. Maximum Life 2. Strength 3. Needed Resistance | Upheaval Size Maximum Life |
| Gloves | 1. Critical Strike Chance 2. Ranks of Upheaval3. Strength | Damage While Berserking +Ranks to Pressure Point |
| Pants | 1. Maximum Life 2. Strength 3. Needed Resistance | Upheaval Size Maximum Life |
| Boots | 1. Movement Speed 2. Fury Per Second 3. Ranks to | Movement Speed + Ranks to Pressure Point |
| Amulet | 1. Cooldown Reduction 2. Attack Speed 3. Fury on Kill | Resource Generation Damage While Berserking |
| Rings | 1. Critical Strike Chance 2. Fury on Kill 3. Attack Speed | Resource Generation Damage While Berserking |
| Weapons | 1. Strength 2. Fury on Kill 3. Maximum Life | Chance for Upheaval to Deal Double Damage Critical Strike Damage |
Gems and Runewords
Gems
Listed below are the best gems to socket into gear for each slot type. In Season 9, you can obtain Horadric Jewels which can be socketed into your Rings and Amulets. For more information on these gems see our Seasonal section below.
- Weapon:
 Topaz for Basic Skill Damage until around level 30 and then
  Ruby for Overpower damage after
 - Armor:
 Ruby for the increase to Strength
 - Jewelry:
 Diamond for the All Resistances.
Runes
While leveling in Vessel of Hatred, you may come across Runes, a unique gem that can be placed into an item with two sockets such as a helm, chest, pants, or two-handed weapon. Putting one Ritual Rune and one Invocation Rune into the same item creates a Runeword which can enhance your gameplay and grant powerful boons. Ritual Runes generate Offering when the conditions are met, and once enough Offering has been met, the associated Invocation Rune’s effect will trigger. Here are some early Rune suggestions for leveling.
| Rune Name | Rune Effect |
| Gain 30 Offering: Cast the same Non-Channeled Skill 3 times | |
| Gain 150 Offering: Cast an Ultimate skill | |
| Requires 50 Offering: Cooldown 1 second, Evoke the Barbarian’s Earthquake, dealing damage to enemies | |
| Requires 5 Offering: Cooldown 1 second, Restore 2.5% Primary Resource |
Horadric Spell (Season 9)
Season 9 brings a new complex mechanic that modifies your skills by attaching an ancient Horadric Catalyst to one of them, which you can then modify further with spells and infusions, causing some very potent combos. For this build, we recommend the following setup:
| Type | Power | Description |
| Catalyst | Awaken an Oracular Rune that pulls in all surrounding enemies. A torrent of stars follow that randomly strike the area 20 times for 1288% damage each. At Rank 10+: Stars periodically fall around you and are guaranteed to crash around a nearby enemy for the same damage | |
| Infusion | Your Catalyst now deals Fire and/or Burning damage. It destroys enemy structures and has a 10% chance to ignite the ground beneath enemies dealing 1215% burning damage over 5 seconds. While equipped, your Fire Damage Bonus is equal to that of your highest damage type bonus. Rank 5+: Deactivates monster Chilling Winds effects for 5 seconds. | |
| Arcana | Your Catalyst deactivates monster damage resistance aura effects for 5 seconds, but you take 15% more damage for the same duration | |
| Arcana | Your Catalyst applies Vulnerable for 8 seconds | |
| Arcana | Invoking your Catalyst grants you gain 20% maximum resource generation per second for the next 10 seconds. |
Assign your Catalyst to your ![]() Upheaval
Upheaval
Additionally, Season 9 brings back new special gems for your Amulets and Rings called Horadric Jewels. We recommend the following gems for this build:
 Idol From Below – You gain x6% Primary Stat, x6% Maximum Life, and are always Unhindered. However, you will be hunted in Sanctuary’s darkest places by Jewel Guardians who were entombed to protect this relic
 Elemental Brand – Your Catalytic Skill deals 33% damage of your Infusion’s element over 3 seconds. Lucky Hit: Dealing damage of your Infusion’s element has up to a 33% chance to trigger its secondary effects.
 Spark of Creation – After you cast your Catalyst Skill gain 5 Primary Resource
Mercenaries
As you play through the campaign in Vessel of Hatred, you will unlock various NPC Mercenaries who can join you on your quest to slay demons. Each Mercenary has their own small talent tree that will give them bonuses and skills to help you. Additionally, you can assign a Mercenary that you don’t take with you as a reinforcement to jump in when you activate certain skills. Let’s take a look at how we want to set this up for this build
We hire Varyana, the Berserker Crone
- Core Skill:
 Cleave
 - Core Skill Passive:
 Hysteria
 - Iconic Skill:
 Bloodthirst
 - Iconic Skill Passive:
 Bloodlust
Our Reinforcement Mercenary will be Raheir, the Shieldbearer
Build Mechanics
Rotation and Playstyle
The majority of your power in this leveling build comes from Upheaval, aiming this into a group of mobs and cutting them down is your goal. Start off with War Cry and Rallying Cry to keep our Fury generation high and trigger Berserking, we can easily manage our enemies by using our basic attack skill or offloading all of our Fury with Upheaval then building back up again.
You may notice that we have more skills than we can place on our bars, this is by design. Early on in our journey we will need to spam ![]() Lunging Strike in order to generate fury. However as gear progresses and levels progress we should be able to keep a more consistent fury pool thanks to
Lunging Strike in order to generate fury. However as gear progresses and levels progress we should be able to keep a more consistent fury pool thanks to ![]() Leap, specifically
Leap, specifically ![]() Power Leap giving us a large amount every time we hit an enemy. If you reach this point while leveling where fury generation is more easily maintained, you can replace
Power Leap giving us a large amount every time we hit an enemy. If you reach this point while leveling where fury generation is more easily maintained, you can replace ![]() Lunging Strike on your bars with
Lunging Strike on your bars with ![]() Challenging Shout or whichever skill you did not originally assign. The must have skills are
Challenging Shout or whichever skill you did not originally assign. The must have skills are ![]() Upheaval
Upheaval ![]() Wrath of the Berserker
Wrath of the Berserker ![]() War Cry and
War Cry and ![]() Rallying Cry.
Rallying Cry. ![]() Lunging Strike, and
Lunging Strike, and ![]() Challenging Shout can be traded out based on your needs. If you need more fury generation, use
Challenging Shout can be traded out based on your needs. If you need more fury generation, use ![]() Lunging Strike. If you need the defensive capability for a tough boss or dungeon, use
Lunging Strike. If you need the defensive capability for a tough boss or dungeon, use ![]() Challenging Shout.
Challenging Shout.
Our other defensive skills and  Challenging Shout, will be used to manage the monsters during the downtime when we do not have enough Fury for Upheaval. This rotational way of playing will become important as it prepares you for the endgame version of this build which is played with a very similar skill set. Let’s review some other important elements we use to power ourselves up for leveling.
Berserking
The most challenging component you are going to have to learn is how to manage Berserking. We have a couple of options to trigger a state of Berserk and add to its uptime, and when done properly, you can keep this state triggered indefinitely. This requires a lot movement to ensure you’re hitting multiple targets with your Upheaval. We gain two seconds of Berserking from our Violent Upheaval perk when two or more enemies are hit. Keeping this in mind and cycling your shouts properly should keep your Berserking renewed constantly. This will become challenging in the early levels when you are struggling with Fury generation, but will vastly improve as you level up and add the needed Legendary Aspects to this leveling build. Additionally, as you begin to use gear with the increase to Critical Strike Chance affix, you will be able to trigger Berserking through your basic attack Combat Lunging Strike. Lastly, and most dependable, is War Cry for easy trigger for Berserking.
Which Elixirs Should You Use?
Visit the Alchemist in any main town to craft helpful Elixirs that increase stats, and experience gain for 30 minutes. Make sure to forage plants and pick up the necessary crafting materials during your adventures; they randomly spawn around the world. Use ![]() Elixir of Advantage for the attack speed but any Elixir you have for the extra experience as they all grant between 5 and 8% increased experience to help you fly to level 60 even faster.
Elixir of Advantage for the attack speed but any Elixir you have for the extra experience as they all grant between 5 and 8% increased experience to help you fly to level 60 even faster.
Return to the Alchemist again every 5 to 10 levels to upgrade your potion. The extra healing is essential to survival.
Season 9 Updates
For a complete overview of Season 9, its mechanics and theme, new leveling activities, and other changes coming with the Season of Horadric Spells, please check out our Season Hub!
Season 9 brings some new updates to the Barbarian. Below are the changes related to this build:
 Lunging Strike damage increased from 33% to 90%
 Leap now slows enemies by 70% instead of knocking them back
- Mighty Leap now deals 40%x damage and knocks enemies back rather than slowing them
Difficulty & Endgame
Once you hit level 60 with this build, you will be ready to tackle harder difficulties as you transition into more challenging content. Make sure to pick one of our recommended Endgame Builds to continue the journey. Additionally, we recommend keeping your Obols until you reach maximum level (60), then spend them on a weapon to help kickstart your preferred endgame build.
Changelog
- June 23rd 2025: Updated for Season 9
- May 5th 2025: Added information about skill selection and clarified skill use.
- April 25th 2025: Reformatted and updated for Season 8
- March 31st 2025: Updated recommended skill tree
- January 19th 2025: Tooltips and Seasonal section updated for Season 7
- January 16th 2025: Build updated for Season 7
- October 3rd 2024: Updated guide for Season 6 and Vessel of Hatred
- August 4th 2024: Guide updated for season 5 and patch 1.5.0
- May 7th 2024: Guide restructured, starting paragon boards added, updated for season 4
- January 21st 2024: Season 3 speculative changes.
- October 23rd 2023: Revamp for Season 2.
- October 13th 2023: Build adjusted to prepare for Season 2 launch.
- August 23rd 2023: Creation of Leveling Guide
