Build Introduction
Welcome to the comprehensive guide for the ![]() Mighty Throw Barbarian for Diablo 4! If you miss the old Diablo game’s “Throwbarian” style builds, then this is the build for you. Thanks to some new unique items, big damage, and a semi-ranged playstyle, this build brings all the fun of tossing tons of weapons around and crushing demons all around you with the safety of not having to be totally in melee, getting hit in return. With that, let’s take a look at how to set up this “Throwbarian” build!
Mighty Throw Barbarian for Diablo 4! If you miss the old Diablo game’s “Throwbarian” style builds, then this is the build for you. Thanks to some new unique items, big damage, and a semi-ranged playstyle, this build brings all the fun of tossing tons of weapons around and crushing demons all around you with the safety of not having to be totally in melee, getting hit in return. With that, let’s take a look at how to set up this “Throwbarian” build!
Strengths and Weaknesses
- Semi-Ranged Playstyle
- Massive single target nuke with good AOE
- Strong defense and survival
- Requires setup rotation for maximum damage
- Reliance on specific uniques and aspects to function
- Resource intensive
Build Requirements
 Aspect of Herculean Spectacle
 Aspect of Delayed Extinction
 Aspect of Earthquakes
Quick Navigation
Want to skip ahead? Use the table below to jump to the sections you are looking for.
Skill Bar and Skill Tree Points
Follow the points allocated in the image shown above for the complete 71 point build. The additional 12 skill points are completed using the Season Journey Ranks.
Barbarian Class Mechanic – The Arsenal System
The Barbarian can wield four weapons simultaneously as well as choose a weapon expertise to use as their Technique allowing them to gain that weapon’s bonus even if they’re wielding another weapon type. Finally, the Barbarian can assign its skills to use different weapon types shuffling between Two-Handed Bludgeoning Weapons, Two-Handed Slashing Weapons, and Dual-Wield Weapons.
For the Mighty Throw build, we will be using the Two-Handed Axe in our Technique slot for the bonus damage against Vulnerable Damage.
We will want to assign our ![]() Mighty Throw skill to use our Two-Handed Bludgeoning Weapon so we can benefit from
Mighty Throw skill to use our Two-Handed Bludgeoning Weapon so we can benefit from ![]() Wallop
Wallop
![]() Whirlwind can be assigned to anything as we’re only using it to empower our
Whirlwind can be assigned to anything as we’re only using it to empower our ![]() Mighty Throw
Mighty Throw
![]() Hammer of the Ancients can only use a Bludgeoning Weapon so we have no choice here
Hammer of the Ancients can only use a Bludgeoning Weapon so we have no choice here
Gear, Stats, Gems, and Runes
The following sections will cover all systems that are critical if you want to improve the power of your character and move towards the highest difficulties in the endgame of Diablo 4.
Legendary Aspects
Below you will find all of the best-in-slot Aspects found on Legendary items that are important for this build. Remember that all Legendary powers can be added into your Codex of Power once you salvage the items. You can still find some aspects through dungeons though they will always be at the minimum power level. To get the most out of this system, combine these Aspects with the right stats.
| Gear Slot | Gems | Aspect / Unique | Aspect / Unique Power |
| Helm | – Casting | ||
| Chest |  Aspect of Grasping Whirlwind Aspect of Grasping Whirlwind | – | |
| Gloves | N/A | – Every 6 seconds, your next | |
| Pants | – You deal [10-20%] increased damage while Unstoppable and for 5 seconds after. When you become Unstoppable, gain 50 of your Primary Resource | ||
| Boots | N/A |  Relentless Berserker’s Aspect Relentless Berserker’s Aspect | – Lucky Hit: Damaging an enemy with a Core Skill has up to a [15-35%] chance to extend the duration of Berserking by 2 seconds. Double this duration if it was a Critical Strike |
| Amulet |  Aspect of Encroaching Wrath Aspect of Encroaching Wrath | – After spending 100 Fury, your next Weapon Mastery or Brawling Skill within 8 seconds deals x[40-80%] increased damage | |
| Ring 1 |  Bold Chieftain’s Aspect Bold Chieftain’s Aspect | – Whenever you cast a Shout Skill, its active Cooldown is reduced by [10-30%] per nearby enemy, up to a maximum of 70% | |
| Ring 2 | – After spending 100 Fury within 5 seconds, your next Non-Channeled Core or Weapon Mastery skill cast within 5 seconds is a guaranteed Critical Strike and deals x[50-80%] increased bonus Critical Strike Damage. | ||
| Two-Handed Bludgeoning Weapon | OR |  Aspect of Delayed Extinction Aspect of Delayed Extinction | – |
| Two-Handed Slashing Weapon | OR |  Aspect of Herculean Spectacle Aspect of Herculean Spectacle | – |
| Dual-Wield Weapon 1 | – Your Weapon Mastery skills are now also Core Skills that have 100% Cooldown Reduction but cost Fury, dealing [50-70%] of normal damage. | ||
| Dual-Wield Weapon 2 |  Aspect of Earthquakes Aspect of Earthquakes | – |
To see how this build compares to the others on our site, you can check out our Endgame Tier List.
Stat Priority and Tempering Affixes
Below are the affixes to prioritize on gear. Each line of affixes is listed in order of importance. Tempering Manuals and their recommended affixes are provided in the second column, and the bolded yellow affixes are the most important targets for Masterworking upgrades. Be sure to check our Tempering and Masterworking guides for more details about these topics.
| Slot | Gear Affixes | Tempering Affixes |
| Helm | 1. Cooldown Reduction 2. Strength 3. Maximum Life 4. Resistance to All Elements | Mighty Throw Pulse Size |
| Chest | 1. Maximum Life 2. Strength 3. Resistance to All Elements 4. Armor | Mighty Throw Pulse Size |
| Gloves | 1. Overpower Damage 2. Ranks to Core Skills 3. Attack Speed 4. Critical Strike Damage | Critical Strike Damage |
| Pants | 1. Maximum Life 2. Strength 3. Resistance to All Elements 4. Armor | Mighty Throw Pulse Size |
| Boots | 1. Movement Speed 2. Strength 3. Ranks to 4. Resistance to All Elements | Movement Speed |
| Amulet | 1. Strength 2. Ranks to 3. Ranks to 4. Cooldown Reduction | 1. Weapon Mastery Cooldown Reduction |
| Rings | 1. Resistance to All Elements 2. Overpower Damage 3. Strength 4. Attack Speed | |
| Two-Handed Bludgeoning Weapon | 1. Strength 2. Maximum Life 3. Overpower Damage 4. Fury On Kill | Chance for |
| Two-Handed Slashing Weapon | 1. Strength 2. Maximum Life 3. Overpower Damage 4. Fury On Kill | Chance for |
| Dual-Wield Weapons | 1. Strength 2. Overpower Damage 3. Maximum Life 4. Critical Strike Damage | Ranks to |
Uniques and Mythic Uniques
Below, you will find information about the various Uniques and Mythic Uniques that are useful to this build. Moreover, if you are interested in target farming Mythic Uniques, check out our How to Farm Mythic Uniques guide.
Uniques
Below you will find the useful uniques for this build.
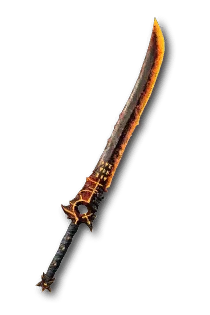 The Third Blade – This unique one-handed sword essentially “turns on” this build and normally allows you to spam
  Mighty Throw with no cooldown, stopped only by our Fury. Due to
  Aspect of Delayed Extinction that won’t quite be the case, as you will be forced to wait the cooldown of 12 seconds no matter what, but you gain an absolutely massive amount of power for doing so.
 Bane of Ahjad-Den – This causes your
  Mighty Throw to detonate all of its pulses instantly every 12 seconds for up to 600% more damage. Since we must wait 12 seconds because of
  Aspect of Delayed Extinction this lines up perfectly. Every throw will trigger Bane’s explosion.
 Ugly Bastard Helm – This helm grants us a large damage bonus while we’re berserking and converts all of our direct damage to fire and then adds another multiplier to all fire damage dealt. This improves both Mighty Throw AND the effect of our new unique Bane.
 Tibault’s Will – These unique pants are still strong today even though they are past their glory days of seasons 2 and 3. They are one of the only pants with a built in damage reduction, granting us some damage reduction while Unstoppable. Most importantly for this build however, they give us a great way to generate resources quickly to spam our throws
 Ring of Red Furor – This ring has been powerful since its introduction but has been coming back into the limelight with recent seasons. This build takes advantage of its guaranteed critical strike and overpower to make sure those land on absolutely massive mighty throws buffed by Bane and Delayed Extinction.
Mythic Uniques
These are the chase rare items in Diablo 4. They have a very low drop rate from most content and a slightly higher drop rate from Tormented Bosses in Torment 1 and beyond. We will be listing only the ones useful to this build. If a mythic unique is not listed here, it is not useful to this build but may be useful to other setups. Let’s take a look.
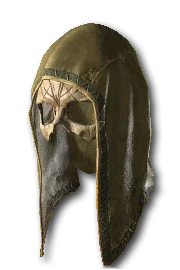 Harlequin Crest – The infamous “Shako” helm. For this build its additional ranks of skills, armor, and cooldown reduction provides more than any other helm. The cooldown reduction helps with Shouts and
  Wrath of the Berserker. However notably, this doesn’t affect
  Mighty Throw ‘s cooldown because of
  Aspect of Delayed Extinction but it will add to its damage multiplier in a big way.
  Shroud of False Death – An extremely powerful chest that grants +1 to all passive skills which grants more fury, more damage, more movement speed and everything you could want as a Barbarian. If you’re lucky enough to acquire one of these items replace your normal chest with it immediately. The stealth bonus is also nice while you’re waiting for your next big
  Mighty Throw cooldown.
Gems and Runewords
Listed below are the best gems to socket into gear for each slot type.
Gems
| Weapon Gems | Armor Gems | Jewelry Gems |
For your jewelry, you can swap between the Diamonds and Skulls as needed. If you need more resistances, take diamonds. If you need more armor take Skulls. As there are no longer caps to these stats you can freely change these as needed based on what’s giving you the most trouble on your journey through sanctuary.
Runes
Runewords return from Diablo 2 in Vessel of Hatred! You are limited to two Runewords across your gear and it requires two sockets in the same item. So this limits creating Runewords by combining two Runes to either Helm, Chest, Pants, or Two-Handed Weapons. We generally recommend them in both of your Two-Handed Weapons for Barbarian. Let’s jump in.
| Rune Name | Rune Effects |
| Gain 300 Offering: Cast 5 Skills then become Exhausted for 3 seconds. | |
| Requires 300 Offering: Cooldown, 3 seconds. Gain 20% Maximum Life for 6 seconds | |
| Gain 25 Offering: Stores offering every 0.3 seconds. Cast a Non-Basic Skill to gain the stored Offering | |
| Requires 400 Offering: Cooldown 1 second, Casting a skill other than a Basic or Defensive spends all of your primary resource and increases your damage by up to 100% for 1 second. |
Paragon Board
We recommend using the following Legendary Nodes and Glyphs to truly take this build into the endgame. Note that each glyph’s information and radius listed below is for the level 100 version. As a reminder, glyph’s reach their maximum radius at level 46 and unlock their Legendary Bonuses at level 45. Let’s take a look!
Season 12 Mechanics
Kill Streak System
Season 12 brings the kill streak mechanic back from previous Diablo games. As you slaughter your way through the hordes of hell you will begin a streak and get a pop-up to start tracking your kill count. Once it begins there is a short period before your streak ends. You refresh the duration of your streak with more kills, direct damage, or on the initial application of damage-over-time effects. Once the timer fully ends, you gain experience and seasonal reputation based on the level of your streak. There are five levels of kill streak based on your current kill count.
Bloodied Items
However, there is more to the kill streak system than just experience and seasonal reputation. A new type of bonus affix can appear on your Legendary items that makes the items “Bloodied” and grants bonuses based on the level of your kill streaks. There are three types. For Armor items you gain ‘Rampage’ items, for Weapons you gain ‘Feast’ items, and for Jewelry you gain ‘Hunger’ items. For this build we recommend the following Bloodied affixes:
- Armor “Rampage” – Cooldown Reduction Per Kill Streak Tier
- Weapon “Feast” – Every 40 Kills, Reset 2 Random Cooldowns
- Jewelry “Hunger” – Chance for Additional Rampage Items during Kill Streaks
Bloodsoaked Sigils
Bloodsoaked Sigils empower content and increase Bloodied drop rewards for your Nightmare Dungeons, Infernal Hordes, and Lair Bosses. Be careful, these Sigils increase the difficulty of the content by around a full Torment level and adds a Relentless Butcher who will continually respawn and stalk you down!
Mercenaries
As you play through the campaign in Vessel of Hatred, you will unlock various NPC Mercenaries who can join you on your quest to slay demons. Each Mercenary has their own small talent tree that will give them bonuses and skills to help you. Additionally, you can assign a Mercenary that you don’t take with you as a reinforcement to jump in when you activate certain skills. Let’s take a look at how we want to set this up for this build
We hire Raheir, the Shieldbearer
- Core Skill:
 Ground Slam
 - Core Skill Passive:
 Raheir’s Aegis
 - Iconic Skill:
 Bastion
 - Iconic Skill Passive:
 Inspiration
Our Reinforcement Mercenary will be Varyana, The Berserker Crone
- Opportunity Skill:
 War Cry
 - Reinforcement Skill:
 Bloodthirst
Build Mechanics
Rotation and Playstyle
This new ![]() Mighty Throw setup is all about one big throw that detonates whatever is in front of you thanks to the new unique,
Mighty Throw setup is all about one big throw that detonates whatever is in front of you thanks to the new unique, ![]() Bane of Ahjad-Den We want to follow this rotation:
Bane of Ahjad-Den We want to follow this rotation:
- Maintain
 Wrath of the Berserker with as much uptime as possible for its damage buffs and berserking
 - Move through packs with
 Whirlwind and to spend Fury for
  Ring of Red Furor and
  Aspect of Encroaching Wrath as well as trigger
  Violent Whirlwind
 - Use
 Hammer of the Ancients on big groups to spend Fury and trigger
  Ring of Red Furor and
  Aspect of Encroaching Wrath and to trigger
  Violent Hammer of the Ancients
 - Keep your
 War Cry up right before you’re able to throw for its damage amplification
 - Every 12 seconds with the buffs from
 Ring of Red Furor,
  Banished Lord’s Talisman,
  Violent Whirlwind, and
  Violent Hammer of the Ancients unleash a
  Mighty Throw that will nuke the whole screen
Runeword Synergy
 Cir grants us a ton of offering for spamming through our shouts and whirlwind while we’re setting up our big throw.
 Xal uses this massive offering to give us a life sustain buff allowing us to live to set up our huge nuke
 Igni builds 25 offering every 0.3 seconds until we cast a non-basic skill. Lucky for us our Shouts and
  Mighty Throw are all non-basic skills and this triggers constantly for us.
 Qax spends our resources to allow our next
  Mighty Throw to do huge damage
Which Elixir Should You Use?
Visit the Alchemist in any main town to craft helpful Elixirs that increase stats, and experience gain for 30 minutes. Make sure to forage plants and pick up the necessary crafting materials during your adventures; they randomly spawn around the world. Use an Elixir providing any Resistance you need most, or ![]() Elixir of Destruction II for the extra overpower damage to make your throws hit even harder.
Elixir of Destruction II for the extra overpower damage to make your throws hit even harder.
Season Updates
For a comprehensive look at what’s new in Season 12, its mechanics and theme, new leveling activities, and other changes, check out our comprehensive Season Hub.
Let’s take a closer look at what changed in Season 12 for this setup:
 Weapons Master fury gained reduced from 12 to 4 but damage increased from 45% to 75%
 Warbringer now grants fortify equal to 2% maximum life down from 10% but now adds an additional 45%x damage while Fortified
Obol Gambling
A final point on acquiring gear is using your Obols to target farm specific slots instead of randomly spending them on random drops. Similar to Kadala in Diablo 3, you can use Obol vendors in town to try and get what you’re missing. With the expansion when a level 60 Character spends Obols, all gear from that vendor will be 750 item power, the highest non-ancestral power allowing you to fill out gear with the affixes or Legendary Aspects you need while also having a small chance to grant Ancestral item power 800 gear.
Check out our Obol Gambling Tool Guide HERE.
Changelog
- March 5th 2026: Updated for Season 12
- December 4th 2025: Updated for Season 11
- September 20th 2025: Chaos Armors updated
- September 17th 2025: Updated for Season 10
- June 28th 2025: Updated for Season 9
- May 2nd 2025: Updated rune recommendations
- April 25th 2025: Reformatted and updated for Season 8
- March 25th 2025: Tooltip correction for some weapon tempers
- January 19th 2025: Tooltip updates and Seasonal section updated for Season 7
- January 13th 2025: Guide updated for Season 7

