


Build Introduction
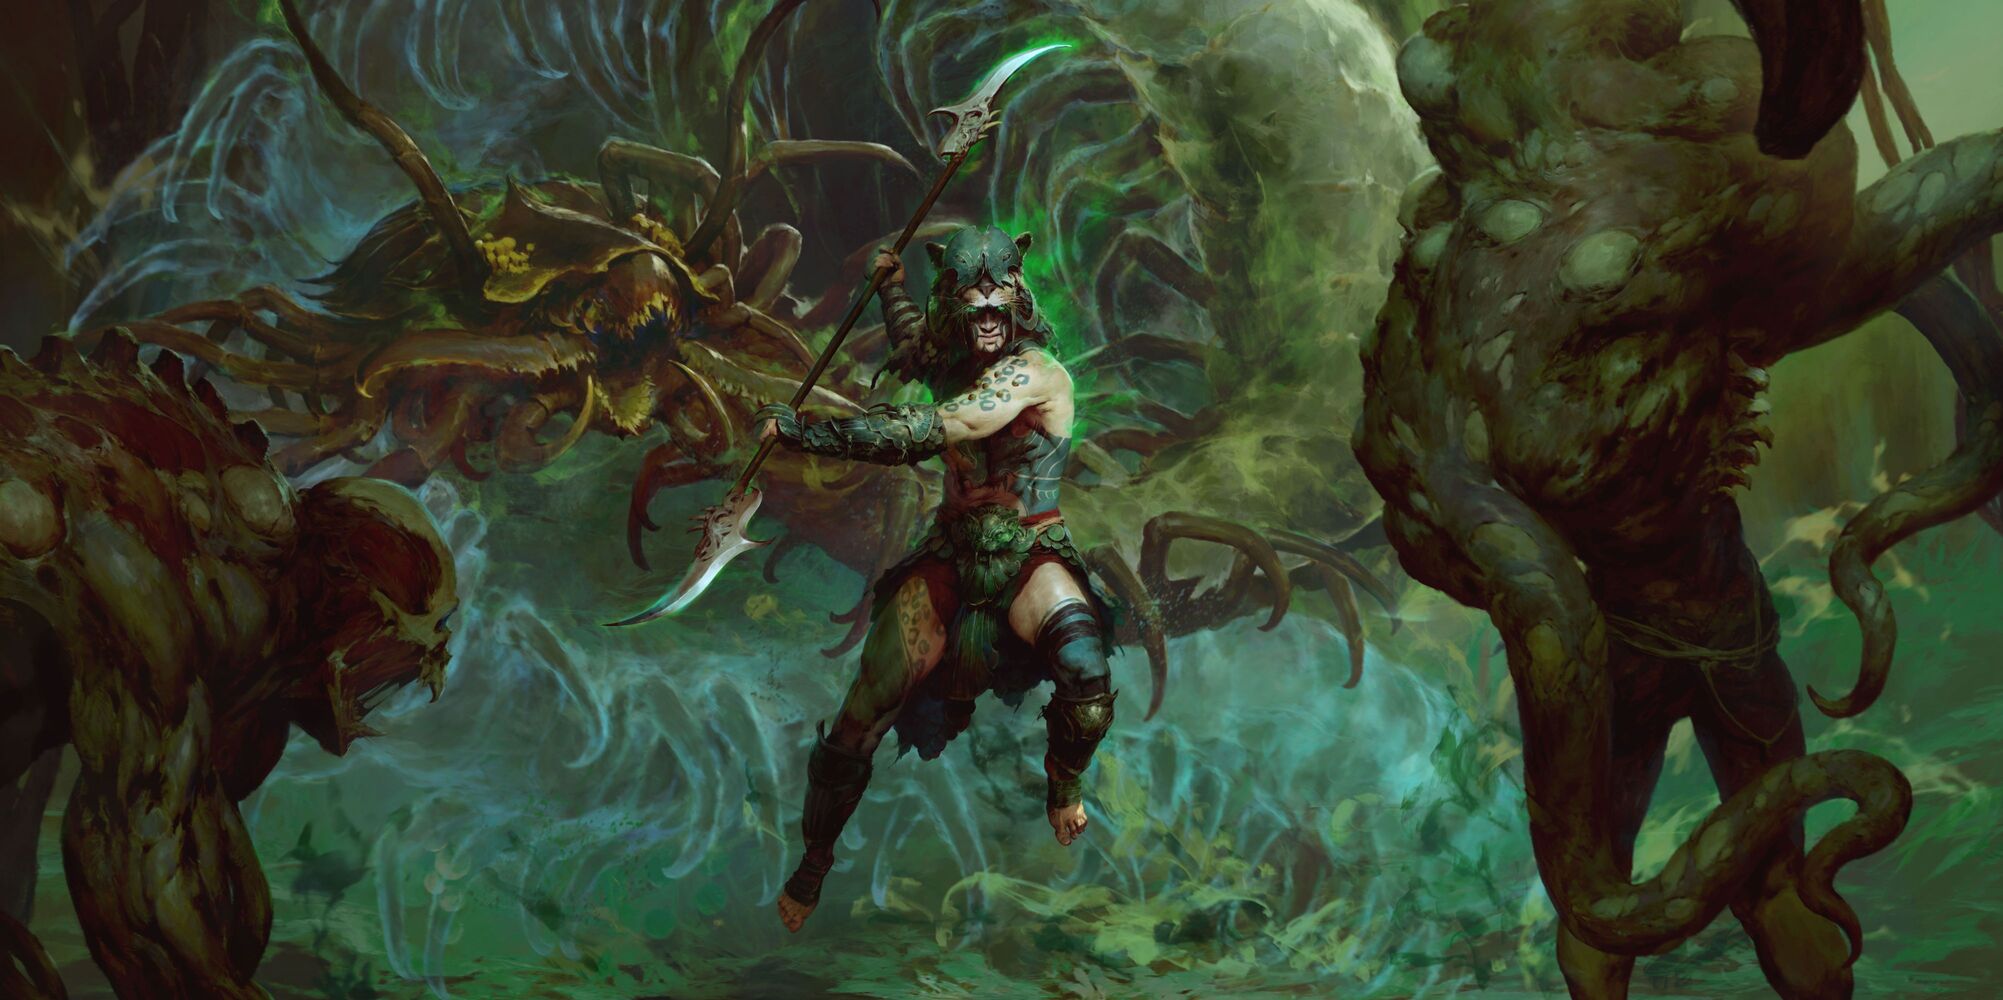
This endgame build for the Spiritborn is all about boosting the Jaguar’s ![]() Rake skill through our Spirit Hall choices in combination with the required Uniques
Rake skill through our Spirit Hall choices in combination with the required Uniques ![]() Harmony of Ebewaka and
Harmony of Ebewaka and ![]() Rod of Kepeleke. This Results in massive single-target and AoE damage from Rake. Additionally, the
Rod of Kepeleke. This Results in massive single-target and AoE damage from Rake. Additionally, the ![]() Ravager adds even more damage, while also helping with mobility and Vigor generation, creating a fast-paced and fierce playstyle.
Ravager adds even more damage, while also helping with mobility and Vigor generation, creating a fast-paced and fierce playstyle.
Starting new? Begin with our Quill Volley Leveling Build and switch to this one at Level 60.
Have questions or feedback about this guide? Join Cashlarond’s livestream and ask him!
Strengths and Weaknesses
- Great mobility.
- Good survivability.
- Good AoE and single-target damage.
- Gear reliant.
- Requires Unique Helmet.
Build Requirements
Want to know more about the Uniques supporting this setup? Jump to the Uniques section.
Quick Navigation
Want to skip ahead? Use the table below to jump to the sections you are looking for.
Skill Bar and Skill Tree Points
Wondering what comes after Level 60? Head to the Paragon Board section to power up the build even further.
And if you want to see how everything plays out in combat, check out the Rotation and Playstyle section for a quick breakdown. If you are missing skill points, complete Season Ranks 1-3 on the Seasonal Realm.
Spiritborn Class Mechanic – Spirit Hall Choice
The Spirit Hall allows you to combine two different Spirit Guardians or stick with just one.
- Primary Spirit Guardian: Eagle
- Casting an Eagle Skill or Evading shoots 6 Storm Feathers, each dealing 140% Lightning damage and applying Vulnerable for 5 seconds. The Storm Feathers Movement Speed bonus is doubled and always active. All Skills are now also Eagle Skills.
- Secondary Spirit Guardian: Gorilla
- Maximum Resolve increased by 2. When you have at least 5 stacks of Resolve, you are Unstoppable.
Gear, Stats, Gems, and Runes
The following sections cover all systems that are important if you want to improve the power of your character in the endgame of Diablo 4.
Legendary Aspects
Each Aspect is listed with its matching gear slot. Do your best to keep each Aspect in the assigned slot. Remember to salvage Legendary Items with higher Aspect values to unlock them in the Codex of Power, and then imprint them onto gear pieces with the preferred affixes. For best results, combine these Aspects with the right stat priorities.
| Gear Slot | Gems/Runes | Aspect / Unique | Legendary Aspect / Unique Power |
|---|---|---|---|
| Helm | According to your secondary Spirit Hall choice, your Skills are all additionally Jaguar, Eagle, Gorilla, or Centipede Skills. Your Skills deal 20-40%(x) increased damage per Spirit type they have. | ||
| Chest | If you haven’t dealt damage in the last 2 seconds, gain Stealth and 40% Movement Speed. | ||
| Gloves | The Protector can be invoked at range and pulls inward with its smashes. Enemies in its area take 30-50%(x) increased damage from your Gorilla Skills, doubled while they are Knocked Down or a Boss. | ||
| Pants | You deal 10-20%(x) increased damage while Unstopable and for 5 seconds after. When you become Unstoppable, gain 100 of your Primary Resource. | ||
| Boots | Every 4-12 meters you move, invoke a base Core Skill from your Primary Spirit Hall | ||
| Amulets(50% bonus) |  Aspect of Redirected Force Aspect of Redirected Force | Gain increased Critical Strike Damage equal to 70%(x) of your Block Chance. Blocking doubles this bonus for 10 seconds. | |
| Ring |  Aspect of Adaptability Aspect of Adaptability | Basic Skills generate 5 additional Primary Resource, once per Skill. Basic Skills deal up to 0.60%[x] increased damage for each point of Primary Resource you have, up to 500 Resource. | |
| Ring | When you critically strike, you regain {x}% of the vigor you’ve spent in the last 2 seconds. Gain | ||
| Weapon (200% bonus) | Your Core Skills are now additionally Basic Skills and free to cast. When cast at Maximum Vigor, your Core Skills consume all Vigor to return to full damage, cast at their largest Size, and become guaranteed Critical Strikes, with x{x}% increased Critical Strike Damage for each point of Vigor Consumed this way. |
Curious how this build compares to other endgame options? Take a look at our Endgame Build Tier List.
Stat Priority and Tempering Affixes
Affixes on the same line are considered to be equally important. Bolded affixes are the most important targets for Greater Affix or Masterworking Capstone Bonus. Be sure to check our Tempering and Masterworking guides for more details about these topics. Want to jump back up to the gear table?
| Slot | Targeted Gear Affix | Tempering Affixes |
|---|---|---|
| Helm | 1. All Stats 2. Movement Speed 3. Dexterity 4. Velocity | N/A |
| Chest | 1. All Stats 2. Damage After Entering Stealth 3. Maximum Life 4. Resource Generation | N/A |
| Gloves | 1. Attack Speed 2. Vulnerable Damage 3. Ultimate Cooldown Reduction 4. Gorilla Skills | N/A |
| Pants | 1. All Stats 2. Critical Strike Chance 3. Maximum Resource 4. Attack Speed | N/A |
| Boots | 1. Movement Speed 2. Ranks to Core Skills 3. Core Damage 4. Impairment Reduction | N/A |
| Amulet | 1. Ranks to Apex 2. Ranks to Brilliance 3. Maximum Resource 4. Attack Speed | |
| Ring 1 | 1. Dexterity 2. Attack Speed 3. Maximum Life 4. Critical Strike Damage | |
| Ring 2 | 1. Dexterity 2. Cooldown Reduction 3. Critical Strike Damage 4. Ranks to Mirage | N/A |
| Weapon | 1. Critical Strike Damage 2. Maximum Resource 3. Ranks to Vigorous 4. Chance for Core Skills to Hit Twice | N/A |
Looking for progression beyond gear? See our Paragon recommendations or Runewords Synergy next.
Uniques and Mythic Uniques
Below, you will find information on Uniques and Mythic Uniques that are useful and recommended for this build. If a Unique or Mythic Unique is not listed here, it is NOT recommended and won’t benefit this specific build in any way.
Uniques
Listed below are the recommended and optional Unique Items for this build.
 Ring of the Midnight Sun (Required): When you Critically Strike, you regain x% of the Vigor you’ve spent in the last 2 seconds. Gain Counterattack’s Passive Effect.
 Harmony of Ebewaka (Required): According to your secondary Spirit Hall choice, your skills are all additionally Jaguar, Eagle, Gorilla, or Centipede skills. Your skills deal x10-30% increased damage per Spirit type they have.
 Rod of Kepeleke (Required): Your Core skills are now additionally Basic skills and free to cast. When cast at maximum Vigor, your core skills consume all vigor to return to full damage, cast at their largest size, and become guaranteed critical strikes, with x0.1-0.5% increased critical strike damage for each point of Vigor spent this way.
 Path of the Emissary (Recommended): Every 12-4 meters you move, invoke a Core Skill from your primary Spirit Hall.
Mythic Uniques
 Ring of Starless Skies (Optional): You can use this over our regular Aspect ring. However, you may run into Vigor issues until later in the game when your gear is more complete. Once you’re able to maintain your resource costs, Starless is a major damage increase.
If you are interested in target farming Mythic Uniques, check out our How to Farm Mythic Uniques guide. Or you can return to the Build Requirements.
Gems and Runewords
Listed below are the recommended Gems and Runewords to socket into your gear.
Gems
| Weapon Gems | Armor Gems | Jewelry Gems |
|---|---|---|
For increased Critical Strike Damage | For more Dexterity | For more Physical or Element Resistances |
Runewords
Runewords are unlocked during the Vessel of Hatred campaign and replace gems in gear. Improve your build by combining a trigger Rune of Ritual and an effect Rune of Invocation. You can equip up to two Runeword pairs (four Runes) at a time. For a detailed guide on Runewords, check out our Runewords Guide!
The following are recommended Runeword combination options for the Rake endgame build of the Spiritborn:
| Runeword Combination | Runeword Effects |
|---|---|
| Poc Xan | |
| Ahu Kry |
Paragon Board
Paragon unlocks at Level 60 and plays a big role in endgame progression. The following Legendary Nodes and Glyphs are recommended for this build. Keep in mind that each Glyph’s information and radius listed below is for the Level 100 version.
Need a refresher on how the skills are set up? Click here to return to the Skill Tree section.
Season 12 Mechanics
Bloodied Items
Season 12 adds Bloodied Items, adding an extra affix to dropped gear that allows for some extremely high-roll loot. These new items synergize with the returning Killstreak system, and can come with specific affixes that increase your overall power, or add bonuses such as gaining extra gold or obols.
Recommended Choices:
- Armor (Rampage)
- Resource Cost Reduction per Killstreak Tier.
- Weapon (Feast)
- Every (x) kills, gain Berserking for (x) seconds.
- Jewelry (Hunger)
- Increased chance for Runes during your Killstreak.
Since Bloodied Items’ effects stack, you’re able to use multiple pieces with the same power.
Armor: Resource Cost Reduction is a massive multiplicative boost for our damage when using ![]() Rod of Kepeleke, and there isn’t really a comparable alternative.
Rod of Kepeleke, and there isn’t really a comparable alternative.
Weapon: Berserking is in the same boat as our Armor; the extra multiplicative damage increase is simply too valuable. Although Restore % Maximum Resource could be used early when we’re still having resource issues.
Jewelry: This is where choices can be made, and it highly depends on the player’s needs. As a generic choice, Runes tend to be the most valuable throughout the entire season. However, it really depends on what you’re lacking and are trying to target farm.
Please make sure to keep wearing all aspects and uniques listed in the build requirements.
Mercenaries
During the Vessel of Hatred campaign, you will unlock Mercenaries to assist you. While you can choose freely early on, we recommend Raheir as your main companion, and Varyana as Reinforcement.
Raheir Skill Tree choices:
- Core Skill:
 Ground Slam
 - Core Passive:
 Raheir’s Aegis
 - Iconic Skill:
 Bastion
 - Iconic Passive:
 Inspiration
Varyana Reinforcement choices:
- Opportunity Skill:
 Rake
Rake - Reinforcement Skill:
 Bloodthirst
Build Mechanics
Rotation and Playstyle
Similar to other endgame builds for the Spiritborn, this one is mechanically straightforward and should be easy to learn and play, making it ideal for those times when you just want to grind the endgame without worrying about perfecting your gameplay. The main mechanic of this build is to boost ![]() Rake‘s damage as much as possible, while using supporting skills for survivability and Vigor generation.
Rake‘s damage as much as possible, while using supporting skills for survivability and Vigor generation.
 Armored Hide as you engage enemies for immediate survivability.
  Scourge for a damage boost and Vigor regeneration.
  Ravager to increase damage and Vigor regen further.
- Rake as our main source of damage.
 The Protector can be used off-cooldown for Elites and Bosses.
 Counterattack is a defensive option for very dangerous pulls, saved for the right moment.
- Spam Rake!
Runewords Synergy
- Poc Xan: This combo rewards spending resource.
 Poc grants you 5 Offering every time you spend 5% of your maximum resource.
  Xan – Your next attack will cause your hits to be a guaranteed Critical Strike and Overpower for 0.35 seconds.
 - Ahu Kry:
 Ahu – generates offering through Lucky Hit against non-Healthy enemies.
  Kry – casts
  Vortex, allowing us to pull in enemies for AoE bursting.
Which Elixirs Should You Use?
Visit the Alchemist and craft an Elixir providing any Resistance you need most, or the Assault Elixir to increase Attack Speed. Some Elixirs cannot be crafted and only drop from activities like Helltides or Nightmare Dungeons.
The following Elixirs and Incense are useful for the Rake Spiritborn build:
 Elixir of Resourcefulness offers the highest damage increase.
 Queen’s Supreme is an offensive choice.
 Soothing Spices gives extra Armor and Resistances if you’re not capped.
Season Updates
For a full overview of what is new in Season 12, please take a look at our comprehensive season hub.
Here is a quick overview of seasonal changes relevant to this build:
- Season 12 didn’t bring any direct changes to Rake Spiritborn. However, expect changes to come with the new Lords of Hatred expansion release.
Obol Gambling
Similar to Kadala in Diablo 3, the Purveyor of Curiosities lets you gamble your Obols for 750 item power gear at Level 60, making them a great way to fill in missing affixes, Aspects, or upgrades. There is also a small chance to receive an Ancestral piece with item power 800.
Changelog
- March 8th, 2026: Updated Skills, Gear, Paragon, and Tempers for Season 12.
- December 8th, 2025: Added Path of the Emissary Boots, Divine Gifts, and Sanctification for Season 11.
- September 20th, 2025: Changed Spirit Hall choices. Added Chaos Perks and Chaos Armor for Season 10.
- June 28th, 2025: Added Horadric Spell and Jewels for Season 9.
- May 14th, 2025: Adjusted the build with a new Skill Tree and Paragon boards. Uniques, Gear requirements, Runewords and Boss Powers were updated.
- April 26th, 2025: Updated for Season 8. Added Boss Powers.
- January 18th, 2025: Updated Tempers and added Witchcraft Powers and Occult Gems for Season 7.
